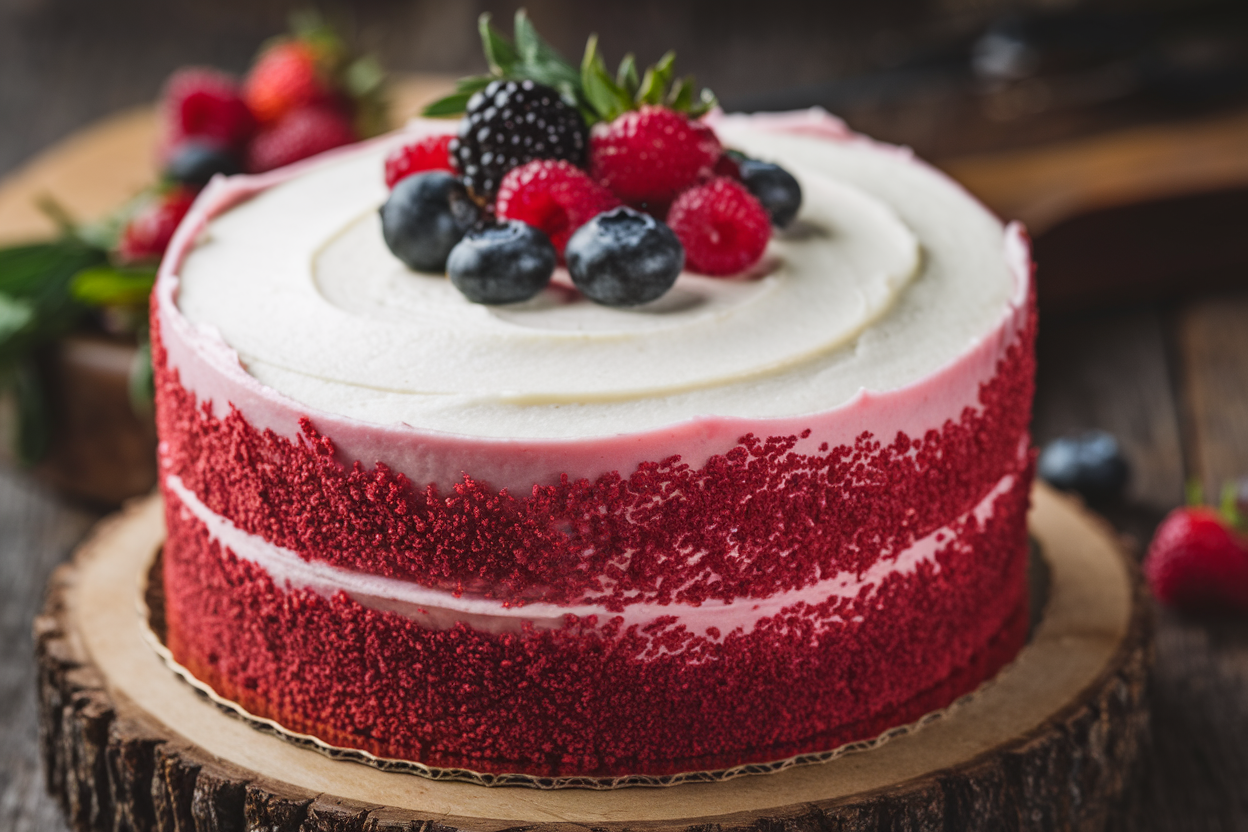
This Red Velvet Cake with Cream Cheese Frosting Will Ruin All Other Desserts (In the Best Way)
Picture a cake so velvety it practically whispers “luxury” with every forkful. Then add a tangy cream cheese frosting that makes you close your eyes mid-bite. That’s not dessert—that’s a mic drop.
You don’t need fancy tools or a pastry diploma; you need a mixing bowl, a plan, and about an hour. Make this once and people will ask you to “bring that red cake” to every event till the end of time.
Why This Recipe Works
This cake balances three pillars: moist crumb, clean chocolate flavor, and bright tang. Buttermilk and a touch of vinegar react with baking soda to lift the batter while keeping it tender and plush.
A small dose of cocoa powder brings depth without turning it into a chocolate cake cosplay.
The oil-butter combo is the secret sauce. Butter adds flavor, while oil keeps it moist for days. The frosting? Softened cream cheese and butter whipped until fluffy, with just enough powdered sugar to make it spreadable, not cloying.
The result is that iconic red velvet experience: bold color, subtle cocoa, tangy frosting, and unapologetic decadence.
What Goes Into This Recipe – Ingredients
- All-purpose flour – 2 1/2 cups
- Granulated sugar – 1 3/4 cups
- Unsweetened natural cocoa powder – 2 tablespoons
- Baking soda – 1 teaspoon
- Fine salt – 1 teaspoon
- Unsalted butter, melted and slightly cooled – 1/2 cup (1 stick)
- Neutral oil (canola or vegetable) – 1/2 cup
- Large eggs – 3, room temperature
- Buttermilk – 1 cup, room temperature
- Sour cream – 1/2 cup, room temperature
- Pure vanilla extract – 2 teaspoons
- White vinegar – 1 teaspoon
- Red gel or liquid food coloring – 2 to 3 tablespoons (gel gives a richer color)
Cream Cheese Frosting:
- Cream cheese – 16 oz (2 blocks), full-fat, softened
- Unsalted butter – 1/2 cup (1 stick), softened
- Confectioners’ sugar – 3 1/2 to 4 cups, sifted
- Pure vanilla extract – 2 teaspoons
- A pinch of salt
- Heavy cream or milk – 1 to 2 tablespoons, as needed for consistency
How to Make It – Instructions
- Prep the pans and oven. Heat oven to 350°F (175°C). Grease and line two 9-inch round cake pans with parchment. Lightly flour the sides.
This prevents the dreaded cake-sticks-to-pan meltdown.
- Whisk dry ingredients. In a large bowl, whisk flour, sugar, cocoa, baking soda, and salt until evenly combined. No lumps, no drama.
- Combine wet ingredients. In another bowl, whisk melted butter, oil, eggs, buttermilk, sour cream, vanilla, vinegar, and food coloring. Aim for a bold, ruby tone—remember the cocoa will mute it slightly in the oven.
- Bring the batter together. Pour the wet mixture into the dry.
Whisk or fold until just combined. Do not overmix; a few small lumps are totally fine.
- Divide and bake. Split batter evenly between pans. Bake 25–30 minutes, until a toothpick comes out with a few moist crumbs. If it’s squeaky clean, you went too far—happens to the best of us.
- Cool completely. Let cakes rest in pans 10 minutes, then turn onto a rack to cool fully.
Frosting + warm cake = slip-and-slide disaster.
- Make the frosting. Beat softened cream cheese and butter on medium-high until smooth and fluffy, 2–3 minutes. Add vanilla and salt. Gradually add powdered sugar, mixing on low, then increase speed.
Add cream to reach a spreadable, fluffy consistency.
- Level the layers. If domed, trim the tops with a serrated knife. Save crumbs for garnish if you want that bakery flex.
- Assemble. Place the first layer on a board. Add a thick layer of frosting (about 1 cup).
Top with the second layer. Apply a thin crumb coat around the sides and top. Chill 20 minutes.
- Finish frosting. Add a final, generous layer of frosting and smooth with an offset spatula.
Press reserved crumbs along the base or sprinkle on top for texture.
Storage Tips
- Room temperature: Keep covered for up to 6 hours if your kitchen is cool. After that, refrigerate.
- Refrigerator: Store covered for 4–5 days. Bring slices to room temp for 20–30 minutes before serving for best texture.
- Freezer: Freeze unfrosted layers, wrapped well, up to 2 months.
Thaw in the fridge overnight, then frost. You can also freeze fully frosted slices individually, because future-you deserves that.
Health Benefits
Okay, it’s cake—not kale—but there are a few wins here. Cocoa delivers antioxidants, and the buttermilk adds calcium and a bit of protein.
The oil keeps the cake moist, which means you don’t need a mountain of extra frosting to fix dryness.
Portion control can be your friend. A smaller slice still gives the full red velvet experience with fewer calories, IMO. Want to push it further?
Use reduced-sugar frosting and smaller layers. Balance, not boredom.
Pitfalls to Watch Out For
- Overbaking: This is the number one cake-killer. Start checking at 24 minutes.
Moist crumbs on the tester are perfect.
- Cold ingredients: Cold eggs and dairy can cause a dense crumb. Room temp is your insurance policy.
- Overmixing: Overworking the batter develops gluten and turns your cake bouncy (not in a good way). Fold just until combined.
- Runny frosting: If the cream cheese is too warm or you add liquid too quickly, it’ll slump.
Chill 10–15 minutes, then rewhip.
- Color disappointment: Cocoa dulls the red. Use gel coloring for a strong hue and don’t skimp.
Alternatives
- Cupcakes: Portion batter into lined tins, 2/3 full. Bake 16–20 minutes.
Perfect for parties where knives mysteriously vanish.
- Three-layer cake: Use three 8-inch pans. Reduce bake time to 20–24 minutes. Taller, more dramatic, very Instagram.
- Gluten-free: Use a 1:1 gluten-free flour blend with xanthan gum.
Expect slightly more tenderness; chill layers before stacking.
- Lower sugar frosting: Start with 2 1/2 cups powdered sugar and adjust. Add 1 tablespoon cornstarch to stabilize without extra sweetness.
- No food coloring: It won’t be red (obviously), but the flavor stays. Or try beet powder/puree for a natural tint, though the color will be more muted.
FAQ
Can I use Dutch-process cocoa?
Stick to natural cocoa.
The baking soda needs its acidity to react properly. Dutch-process can dull the rise and the flavor balance.
Why add both oil and butter?
Butter brings rich flavor; oil keeps the crumb moist for days. Together, they’re the dream team.
All-butter cakes dry out faster—great for scones, not for red velvet.
My frosting is too sweet. Help?
Beat in a pinch of salt and a teaspoon of lemon juice or more cream cheese. You can also add 1–2 tablespoons of cream to mellow it out, then rewhip until fluffy.
How do I get cleaner slices?
Chill the cake for 20–30 minutes, then slice with a hot, sharp knife wiped clean between cuts.
It’s a tiny ritual with big payoffs.
Can I make this ahead?
Yes. Bake layers a day ahead, wrap, and refrigerate. Frost the day of serving.
Frosted cake also holds well overnight, covered, for a party-ready finish.
Final Thoughts
Red Velvet Cake with Cream Cheese Frosting is the culinary equivalent of a standing ovation. It’s plush, tangy, dramatic, and absurdly satisfying. With a few smart steps—room-temp ingredients, gentle mixing, and a confident frosting job—you’ll nail bakery-level results at home.
Make it for birthdays, holidays, Tuesdays—whatever excuse you need.
Just know: once people taste it, this becomes your signature move. And honestly? You won’t mind one bit.
Printable Recipe Card
Want just the essential recipe details without scrolling through the article? Get our printable recipe card with just the ingredients and instructions.