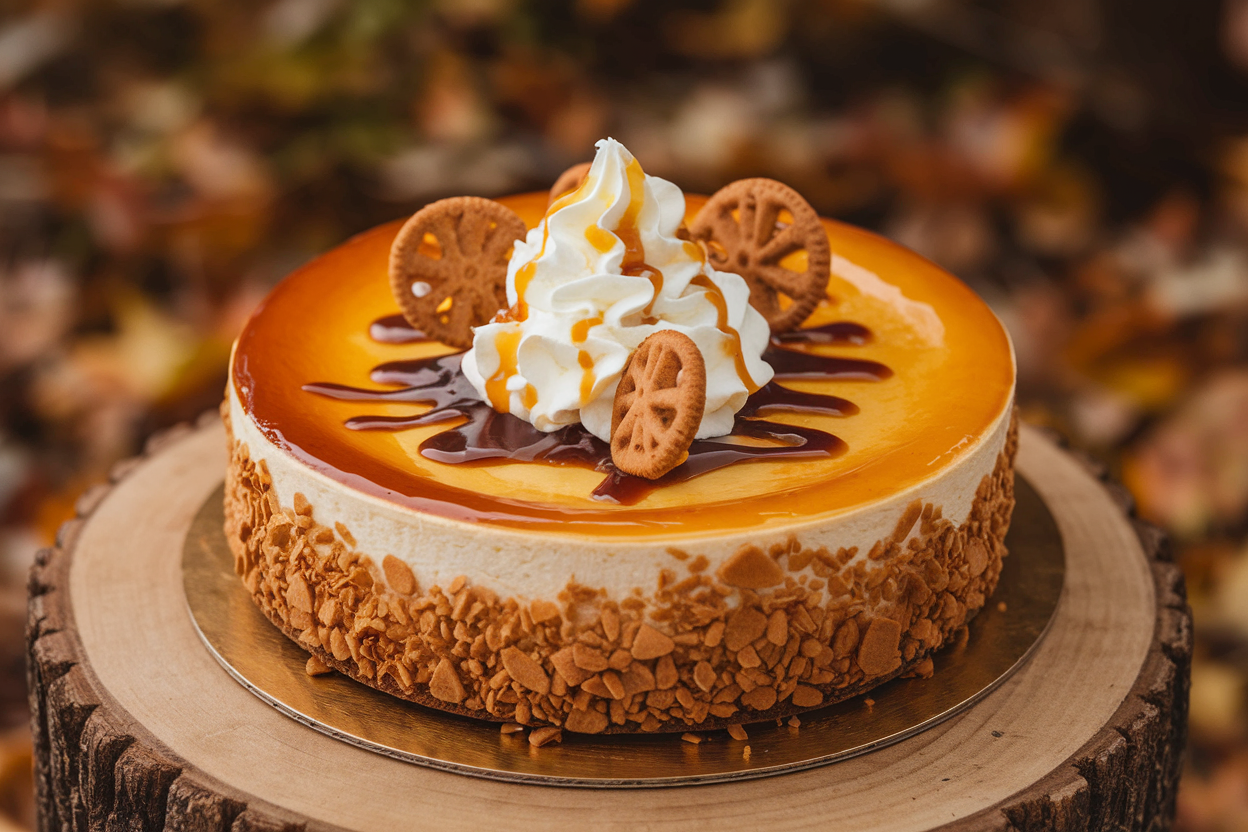
Stop Scrolling: This Biscoff Lotus Cheesecake Will Ruin Plain Desserts Forever
You want a dessert that looks like a bakery flex but tastes like a childhood memory upgraded with a billionaire budget? This Biscoff Lotus Cheesecake hits both. It’s creamy, spiced, caramelly, and unapologetically extra—like a hug from your favorite aunt who always brings snacks.
No baking marathon, no complicated techniques, just outrageous flavor layered into a silky cheesecake that makes store-bought feel like a prank. Bring this to any gathering and watch the “Who made this?” texts roll in.
The Secret Behind This Recipe
The magic is balance: gingerbread-like Biscoff cookies and caramelized cookie butter meet a tangy cream cheese base. The spice from the cookies cuts the richness, while the melted cookie butter creates a glossy topping that looks like you hired a pastry chef.
A little lemon juice adds brightness so the cheesecake doesn’t taste like straight sugar. We also use stabilized whipped cream folded into the batter for a lush, mousse-like texture without baking. And here’s the kicker: a touch of salt.
It wakes up every flavor, making the caramel notes pop. Think cheesecake meets holiday cookie, but streamlined.
Ingredients
- For the crust:
- 250 g Lotus Biscoff cookies (about 2 cups crushed)
- 100 g unsalted butter, melted (7 tbsp)
- 1 tbsp brown sugar (optional, for extra caramel depth)
- Pinch of fine sea salt
- For the filling:
- 600 g full-fat cream cheese, room temperature
- 120 g granulated sugar (about 1/2 cup + 2 tbsp)
- 200 g Lotus Biscoff spread (cookie butter), softened
- 180 ml heavy cream (3/4 cup), very cold
- 1 tsp pure vanilla extract
- 1 tbsp lemon juice (fresh)
- 1/4 tsp fine sea salt
- For the topping:
- 200 g Lotus Biscoff spread (cookie butter)
- 2–3 tbsp heavy cream (to loosen, if needed)
- 6–8 Lotus Biscoff cookies, crushed or halved for garnish
- Equipment:
- 8- or 9-inch springform pan
- Food processor or rolling pin
- Electric mixer (hand or stand)
- Parchment paper
- Offset spatula (nice to have)
Cooking Instructions
- Prep the pan. Line the bottom of your springform with parchment. Lightly grease the sides to prevent sticking.
Yes, this matters when you unmold.
- Make the crust. Pulse Biscoff cookies into fine crumbs. Stir in melted butter, brown sugar, and salt until it resembles wet sand. Press firmly into the pan base, going slightly up the sides.
Chill 15 minutes to set.
- Beat the base. In a large bowl, beat cream cheese, sugar, vanilla, lemon juice, and salt on medium until smooth and fluffy, 2–3 minutes. Scrape the bowl like you mean it.
- Add the cookie butter. Mix in 200 g Biscoff spread until fully combined. The batter should be glossy and caramel-tan.
Try not to eat it all—discipline is a thing.
- Whip the cream. In a cold bowl, whip heavy cream to medium-stiff peaks. Don’t go brick-hard or the texture suffers.
- Fold it in. Gently fold whipped cream into the cheesecake base in three additions. Keep air in the mixture for that cloudlike finish.
- Fill and level. Spoon filling over the chilled crust.
Smooth the top with an offset spatula. Tap the pan lightly to pop large air bubbles.
- Chill to set. Cover and refrigerate at least 6 hours, ideally overnight. Patience equals clean slices and a confident swagger.
- Make the topping. Gently warm 200 g Biscoff spread in the microwave for 15–25 seconds.
Whisk in 2–3 tbsp cream if it seems too thick; you want a pourable glaze, not cement.
- Glaze it. Release the chilled cheesecake from the springform. Pour the warm topping over the center and nudge it to the edges for a smooth finish or drip effect.
- Decorate. Garnish with crushed or halved cookies around the edge. Pop back in the fridge 20–30 minutes to set the glaze.
- Slice cleanly. Use a hot, dry knife for each cut.
Wipe between slices. It’s the difference between “nice” and “wow.”
Keeping It Fresh
Store covered in the fridge for up to 5 days. The glaze helps lock in moisture, but keep it airtight to avoid fridge odors (no one wants onion-scented cheesecake, thanks).
For longer storage, freeze slices individually for up to 2 months. Wrap tightly in plastic and foil. Thaw in the fridge overnight for best texture.
If you’re making ahead, assemble the crust and filling, chill overnight, then glaze day-of for a just-made look. IMO this is the pro move for parties.
Nutritional Perks
Let’s be honest: this is dessert, not a multivitamin. But there are small wins.
Cream cheese and cream provide protein and calcium, while the lemon juice adds brightness without extra calories. The spices in Biscoff (cinnamon, nutmeg hints) bring flavor oomph so you don’t need excessive sugar. Per generous slice (1/12 of a 9-inch cake), expect roughly 420–520 calories, with a mix of carbs and fats, plus 6–8 g protein.
It’s a treat—pace yourself, enjoy it slowly, and maybe don’t pair it with a milkshake.
Avoid These Mistakes
- Skipping room-temp cream cheese. Cold bricks cause lumps. Softened cheese blends silky and saves you from overmixing.
- Overwhipping the cream. Stiff, grainy cream won’t fold well and can cause a dense, broken texture.
- Forgetting the salt. A pinch makes flavors snap into focus. Without it, the cheesecake tastes flat-sweet.
- Pouring hot topping on a warm cake. Bad combo.
Always glaze a fully chilled cake so it sets shiny, not streaky.
- Short-chilling. The set time is non-negotiable. Cut early and you’ll get cheesecake slump with a side of regret.
Variations You Can Try
- Swirled Duo. Reserve 1/3 cup filling. Mix with 2 tbsp extra Biscoff spread and swirl into the top for a marbled look.
- Salted Caramel Crown. Replace half the glaze with salted caramel sauce and sprinkle flaky sea salt.
Sweet-salty win.
- Espresso Hit. Add 1–2 tsp instant espresso to the filling. Coffee + Biscoff = dangerously good.
- Chocolate Crunch. Mix 1/2 cup mini chocolate chips into the filling and drizzle melted dark chocolate over the glaze.
- Mini Cheesecakes. Press crusts into a lined muffin tin, fill, and chill 3–4 hours. Glaze each like a tiny VIP.
- Dairy-Lite. Swap part of the cream cheese for full-fat Greek yogurt (up to 200 g) for tang and a lighter feel.
Stabilize with an extra tablespoon of sugar.
FAQ
Do I have to use a springform pan?
You’ll get the cleanest release with a springform, but a deep pie dish works in a pinch. Line with parchment overhang so you can lift it out. Slices won’t be as tall, but the flavor flex remains.
Can I make this gluten-free?
Yes—use gluten-free speculoos-style cookies for the crust.
Many brands mimic the spice profile closely. The filling is naturally gluten-free.
What if I only have light cream cheese?
It works, but the texture will be softer. Add 1 tsp powdered gelatin bloomed in 1 tbsp cold water and melted briefly to stabilize, then mix in after the cream cheese stage.
How do I prevent a greasy crust?
Measure butter accurately and crush cookies finely.
If it looks oily, add a tablespoon or two more crumbs. Press firmly but don’t compress to concrete; you want structure, not a brick.
Can I bake this instead of chilling?
This recipe is designed no-bake. If you crave a baked style, skip the whipped cream, add 2 eggs to the filling, and bake at 325°F (165°C) for 35–45 minutes until set at the edges and wobbly in the center.
Cool and glaze as directed.
Why is my topping dull or streaky?
Either the spread overheated or the cake wasn’t cold. Warm the Biscoff gently and pour over a fully chilled surface. A spoonful of cream stirred in restores shine.
How far in advance can I make it?
Up to 48 hours before serving.
Keep it covered and glaze within 6–12 hours of serving for best sheen and crunch on the garnish.
The Bottom Line
Biscoff Lotus Cheesecake is the dessert equivalent of a mic drop: bold flavor, silky texture, and a glossy finish that looks straight off a pastry case. It’s easy, make-ahead friendly, and wildly crowd-pleasing—no oven tantrums required. Follow the tips, don’t rush the chill, and prepare for compliments you absolutely earned.
FYI, saving a slice for “tomorrow you” is the wisest decision you’ll make all week.
Printable Recipe Card
Want just the essential recipe details without scrolling through the article? Get our printable recipe card with just the ingredients and instructions.