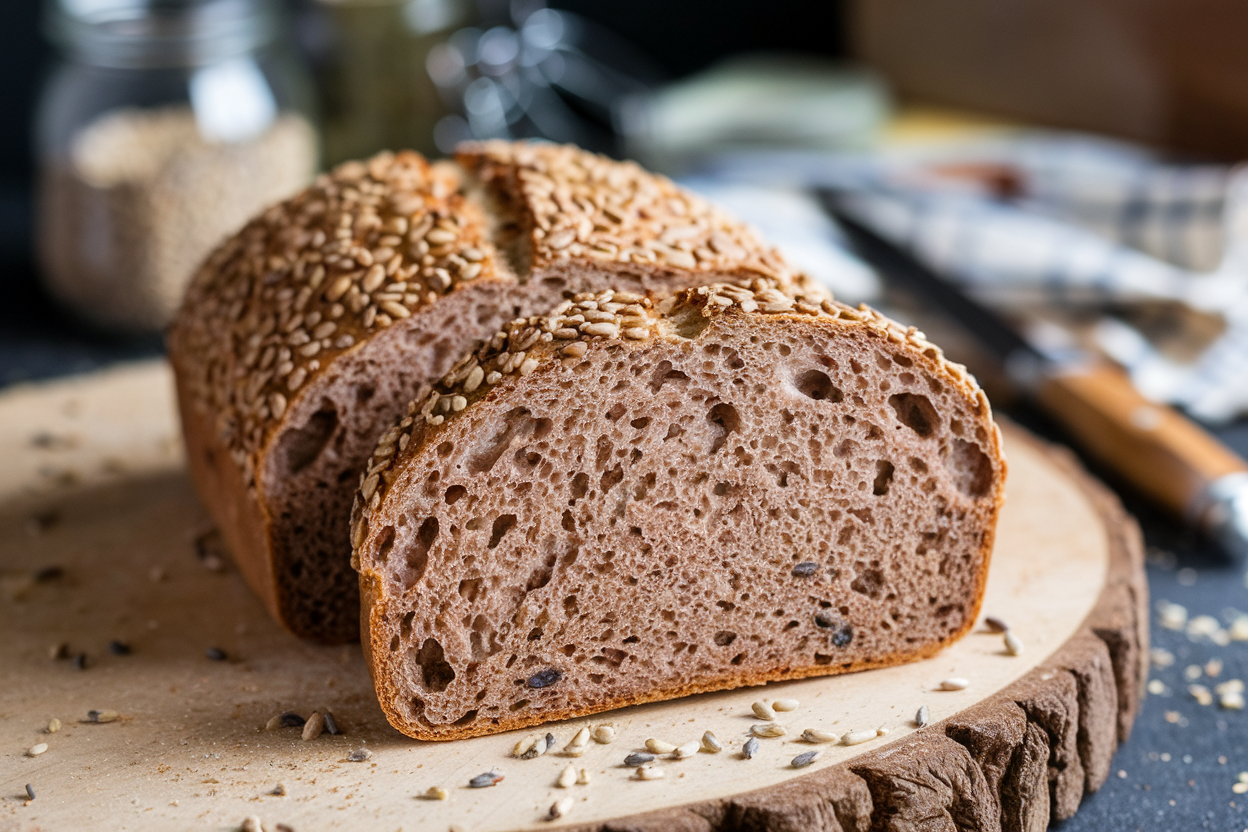
Seeded Sourdough Loaf: The Crunchy-Crust Powerhouse Your Toast Dreams About
You want better bread? Stop chasing supermarket “artisan” labels and make the loaf that actually changes your mornings. This Seeded Sourdough Loaf is crunchy, nutty, and flexes a tang that wakes up butter like it owes you money.
It’s bakery-level with a rugged, seedy swagger—and yes, you can pull it off in a home oven. The best part: it rewards patience, not perfection. Give it a day, and it gives you the loaf you’ll brag about all week.
Why This Recipe Works
This loaf layers flavor on flavor: a strong sourdough base with a toasted seed mix that brings texture and nuttiness.
The hydration level keeps the crumb open but manageable, so you don’t need octopus hands to shape it. Autolyse and stretch-and-fold build gluten without kneading marathons. The overnight cold proof amps up tang, tightens structure, and makes the seeds stick around instead of falling off like confetti.
We use a mix of seeds inside and out for crunch and aroma.
Hydrating the seeds prevents moisture theft from the dough. Baking in a Dutch oven traps steam for that shattering crust. It’s not magic—it’s just good systems.
What You’ll Need (Ingredients)
- Active sourdough starter: 100 g (100% hydration, bubbly and recently fed)
- Bread flour: 350 g
- Whole wheat flour: 150 g
- Water: 375–400 g (start at 375 g; adjust based on flour and environment)
- Fine sea salt: 10 g
- Honey or maple syrup (optional): 10 g for subtle sweetness and browning
- Seed mix (total ~120 g):
- Sunflower seeds: 40 g
- Pumpkin seeds: 30 g
- Sesame seeds (white or mixed): 25 g
- Flaxseeds: 15 g
- Poppy seeds: 10 g
- Water for soaking seeds: 60–80 g (just enough to cover; drain excess)
- Extra seeds for coating: 2–3 tablespoons
- Rice flour (for dusting the basket): 1–2 tablespoons
How to Make It – Instructions
- Toast the seeds. In a dry skillet over medium heat, toast the sunflower, pumpkin, and sesame seeds 2–3 minutes until fragrant.
Keep them moving. Remove, cool, and mix with flax and poppy. Soak with just enough water to cover for 20–30 minutes; drain any excess.
- Mix the dough (autolyse). In a bowl, combine bread flour, whole wheat flour, and 360 g water.
Stir until shaggy. Cover and rest 30–45 minutes. This jumpstarts gluten and makes your life easier.
- Add starter, salt, and sweetener. Add 100 g active starter, 10 g salt, and honey/maple if using.
Squeeze and fold to incorporate. If dough feels stiff, add remaining water a little at a time. You want tacky, not soupy.
- Bulk fermentation + folds. Over 2.5–3.5 hours at 75–78°F (24–26°C), perform 3–4 sets of stretch-and-fold every 30 minutes.
After the first fold, gently work in the soaked seed mix in two additions to avoid clumping. Dough should get smoother and hold shape better after each round.
- Bench rest and pre-shape. Turn dough onto a lightly damp or very lightly floured surface. Pre-shape into a loose round with a bench scraper.
Rest 20 minutes uncovered. It should relax but not pancake.
- Final shape. Shape into a tight boule or batard. Don’t crush the dough; tension on the surface is the goal.
If coating with seeds, mist the surface and roll in extra seeds for a dramatic crust.
- Proof. Place seam-side up in a rice flour–dusted banneton or towel-lined bowl. Cover and cold proof in the fridge 10–16 hours. This deepens flavor and makes scoring clean.
FYI, longer proofing = more tang.
- Preheat the oven. Put a Dutch oven and lid inside. Preheat to 475°F (245°C) for at least 45 minutes. Hot-hot is non-negotiable.
- Score and bake. Turn the dough onto parchment, score with a lame (a bold 1/2-inch-deep slash at 30–45° works).
Load into the Dutch oven. Bake covered 20 minutes at 475°F, then uncover and bake 20–25 minutes at 450°F until deep brown with blistered crust.
- Cool completely. Transfer to a rack and wait at least 1–2 hours before slicing. Yes, really.
Cutting early vents moisture and ruins the crumb. Patience = pro-level texture.
Storage Tips
- Short-term: Store cut-side down on a board and loosely cover with a clean towel for up to 24 hours.
- 2–4 days: Keep in a paper bag inside a bread box or a linen bag. Avoid plastic—it softens the crust.
- Freezing: Slice, wrap tightly, and freeze up to 2 months.
Toast straight from frozen for instant glory.
- Revive the crust: Re-crisp in a 350°F (175°C) oven for 8–10 minutes. Your toaster isn’t the hero here.
Why This is Good for You
The seed mix brings healthy fats, fiber, and minerals like magnesium, zinc, and iron. Whole wheat flour adds more fiber and micronutrients without making the loaf dense.
Naturally leavened dough tends to be easier on digestion and may improve mineral bioavailability thanks to fermentation. Plus, the protein and fat from seeds slow carb absorption—translation: steadier energy, fewer snack attacks.
And let’s be honest: a slice of this with avocado or eggs beats sugary breakfast chaos. It’s real food that actually satisfies.
Avoid These Mistakes
- Using a sleepy starter: If your starter doesn’t double and smell pleasantly tangy, wait.
Weak starter = flat loaf.
- Skipping the seed soak: Dry seeds rob moisture. Then your crumb is dry and you’re sad.
- Over-hydrating blindly: More water isn’t always better. Aim for dough that’s tacky but holds shape.
- Under-proofing or over-proofing: Under = tight crumb; over = collapse.
The fridge proof helps control this.
- Flour bombing the counter: Too much flour kills surface tension. Use a damp surface or just a whisper of flour.
- Cutting hot bread: It smells amazing. Still, don’t.
Steam must redistribute or the interior gums up.
Alternatives
- Flour swaps: Replace 50–100 g of whole wheat with rye for deeper tang and color. Add 20–30 g spelt for nuttiness and a slightly more open crumb.
- Seed variations: Try nigella, hemp hearts, or chia (soak chia well). No sunflower?
Double pumpkin. It’s flexible.
- No Dutch oven: Use a preheated baking steel or stone with a roasting pan of boiling water on the lower rack. Steam for the first 15 minutes.
- Gluten-sensitive (not celiac): Increase fermentation time on the cold proof to 18–20 hours for more breakdown.
Still wheat, still gluten—just gentler, IMO.
- Sweet twist: Add 40 g chopped dried figs or apricots with the seeds. Insane with goat cheese.
FAQ
How do I know my starter is ready?
It should double in 4–6 hours after feeding, look airy with bubbles, and pass the float test in water. The smell should be pleasantly tangy, not harsh or boozy.
Can I make this same-day?
Yes, but flavor and structure improve with an overnight cold proof.
If you must, proof at room temp until dough springs back slowly when poked and bake the same day.
What if my dough is too sticky to handle?
Wet your hands, use a bench scraper, and give it an extra fold or two. Stickiness often resolves as gluten develops. Resist dumping flour everywhere.
How do I prevent seeds from burning?
Toast lightly and avoid scattering too many seeds directly on top.
A covered bake for the first 20 minutes protects the surface; lower the temp slightly if your oven runs hot.
My loaf didn’t rise much. What happened?
Likely culprits: underactive starter, cold dough, or over-proofing. Check starter strength, aim for a warm bulk, and watch the dough, not the clock.
Can I use all-purpose flour instead of bread flour?
Yes, but reduce water slightly (by 10–20 g) and expect a bit less structure.
You’ll still get a great loaf with good technique.
Is honey necessary?
No. It enhances browning and adds a whisper of sweetness, but the loaf is excellent without it. Skip if you’re keeping it strictly savory.
In Conclusion
This Seeded Sourdough Loaf delivers on crunch, tang, and serious breakfast swagger.
You’ll build gluten with minimal effort, layer in a powerhouse seed mix, and finish with a bakery-style crust at home. Follow the timeline, trust the fridge proof, and let it cool like a pro. The result?
A loaf that turns toast, sandwiches, and snacking into a tiny celebration—every single slice.
Printable Recipe Card
Want just the essential recipe details without scrolling through the article? Get our printable recipe card with just the ingredients and instructions.