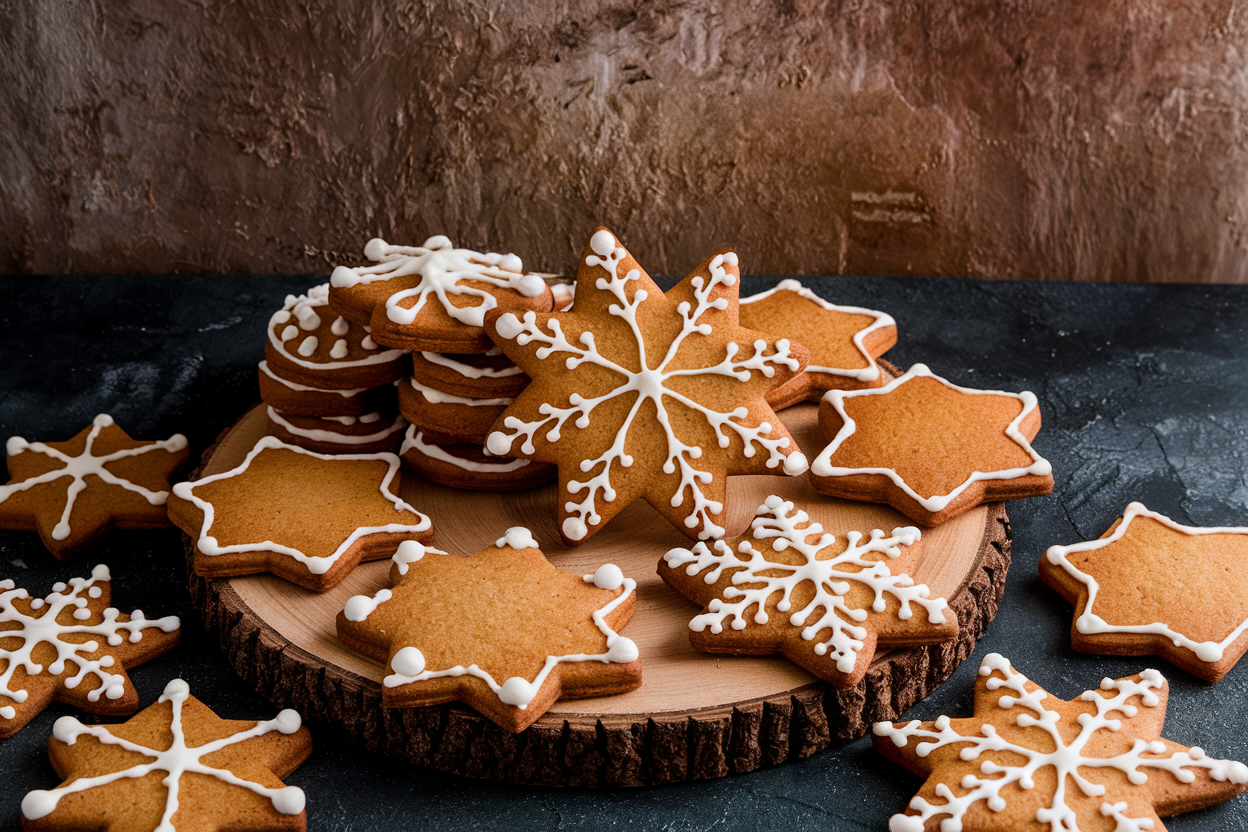
Gingerbread Cookies with Royal Icing: The Holiday Flex That Smells Like Winning
You want a December power move? Forget the store-bought tin. These Gingerbread Cookies with Royal Icing are the kind that make neighbors whisper and kids negotiate curfew extensions.
They’re crisp at the edges, soft in the center, and smell like equal parts nostalgia and victory. The icing dries glossy and snap-clean—perfect for decorating without turning your kitchen into a sugar swamp. And yes, they hold their shape.
No bloated snowmen. Just flawless cut-outs that look like you meant it.
Why This Recipe Works
This dough balances molasses with brown sugar to keep the cookies tender and flavorful without going cakey. A blend of ginger, cinnamon, cloves, and nutmeg delivers that classic warmth, while a bit of black pepper adds a subtle edge (trust me, it slaps).
Chilling the dough firms up the fat so shapes don’t spread, which is how you get sharp stars and crisp trees instead of mystery blobs. The royal icing uses meringue powder for stability, meaning it dries hard, shiny, and stackable—cookie box friendly.
We also portion the flour carefully so the dough rolls smoothly without cracking or sticking. The baking time is calibrated for texture: 7–9 minutes for soft centers, 10–11 for crunch.
The result? Cookies that taste like a tradition and look like a Pinterest win—without the chaos.
Ingredients Breakdown
- All-purpose flour (3 1/4 cups, spooned and leveled) – Structure and shape retention.
- Baking soda (1 teaspoon) – Light lift to prevent dense cookies.
- Fine sea salt (1/2 teaspoon) – Balances sweetness.
- Ground ginger (2 1/2 teaspoons) – The star spice; warm and zesty.
- Ground cinnamon (1 1/2 teaspoons) – Comforting, fragrant backbone.
- Ground cloves (1/2 teaspoon) – Deep, spicy notes; don’t overdo it.
- Ground nutmeg (1/4 teaspoon) – Subtle warmth; optional but recommended.
- Finely ground black pepper (1/4 teaspoon) – Secret complexity; optional but chef’s kiss.
- Unsalted butter, softened (3/4 cup, 170 g) – Tender crumb and flavor.
- Dark brown sugar (3/4 cup, packed) – Moisture and molasses depth.
- Unsulphured molasses (1/2 cup) – Classic gingerbread taste and color.
- Large egg (1) – Binds and enriches.
- Pure vanilla extract (2 teaspoons) – Rounds out flavors.
- Optional orange zest (1 teaspoon) – Bright citrus lift, highly recommended.
For the Royal Icing
- Powdered sugar (4 cups, sifted) – Smooth, lump-free icing.
- Meringue powder (3 tablespoons) – Stability without raw egg whites.
- Warm water (6–8 tablespoons, divided) – Adjust for piping vs. flooding.
- Vanilla or almond extract (1/2 teaspoon) – Flavor upgrade.
- Gel food colors – For decorating; gel maintains consistency.
The Method – Instructions
- Whisk the dry team. In a large bowl, whisk flour, baking soda, salt, ginger, cinnamon, cloves, nutmeg, and black pepper. Set aside.
- Cream the butter and sugar. In a stand mixer, beat butter and brown sugar on medium until fluffy, about 2 minutes.
Add molasses, egg, vanilla, and optional orange zest; beat until combined. It may look slightly curdled—don’t panic.
- Bring it together. Add dry ingredients in two additions on low speed until a cohesive dough forms. If still sticky, add 1–2 tablespoons flour max.
Don’t overmix.
- Chill like you mean it. Divide dough in half, flatten into discs, wrap tightly, and chill 2 hours (or up to 2 days). Chilled dough equals crisp edges and clean cut-outs.
- Prep to bake. Preheat oven to 350°F (175°C). Line baking sheets with parchment.
Lightly flour your work surface and rolling pin.
- Roll and cut. Roll dough to 1/4 inch thickness for soft centers or 1/8 inch for crisp cookies. Cut shapes with floured cutters. Re-roll scraps once for best texture.
- Bake smart. Transfer to sheets, spacing 1 inch apart.
Bake 7–9 minutes for soft, 10–11 for crisp. Edges should look set and slightly darkened; centers puffed. Cool on sheet 5 minutes, then transfer to a rack.
- Make the royal icing. In a stand mixer bowl, whisk powdered sugar and meringue powder.
Add 6 tablespoons warm water and extract; beat on medium-high 3–5 minutes until thick, glossy peaks. Add more water by teaspoons to desired consistency.
- Adjust consistencies. For outlines, aim for toothpaste-thick icing that holds a line. For flooding, thin to honey-like flow that smooths in 10–15 seconds.
Separate and color with gel dyes as desired.
- Decorate like a pro. Pipe outlines, then flood. Use a toothpick to pop bubbles and nudge icing into corners. Add sprinkles while wet.
Let dry at room temp 6–12 hours until fully set.
- Flex responsibly. Once dry, stack between parchment or pack for gifting. Try not to eat them all first. No promises.
Storage Instructions
- Un-iced cookies: Store airtight at room temperature up to 1 week or freeze up to 3 months.
- Iced cookies: Once fully dry, store in a single layer or between parchment sheets in an airtight container for 7–10 days.
- Dough: Refrigerate up to 2 days or freeze up to 2 months.
Thaw overnight in the fridge before rolling.
- Royal icing: Keep covered with plastic touching the surface and a lid on top for up to 2 days at room temp. Re-whip briefly and adjust with water as needed.
Benefits of This Recipe
- Foolproof shapes: The dough holds crisp edges for detailed cutters.
- Custom texture: Soft or crunchy—your call, just tweak thickness and bake time.
- Stackable icing: Royal icing dries hard and glossy for stunning designs and easy gifting.
- Flavor depth: Molasses plus spice blend = bakery-level taste.
- Make-ahead friendly: Dough, cookies, and icing all store well. FYI: perfect for parties.
Pitfalls to Watch Out For
- Skipping the chill: Warm dough spreads and blurs shapes—aka the gingerbread ghost effect.
- Over-flouring: Too much bench flour makes tough cookies.
Dust lightly and use parchment if needed.
- Overbaking: Gingerbread darkens fast; pull when edges set. They firm as they cool.
- Icing too thin or thick: Flood should settle in 10–15 seconds. If it sits like spackle or runs off the cookie, adjust with water or sugar.
- Stacking before dry: Give icing 6–12 hours.
Impatience = smudged art. Ask me how I know.
Recipe Variations
- Chewy Ginger Molasses: Add 1 tablespoon honey and bake on the shorter side for extra chew.
- Chocolate Gingerbread: Swap 1/4 cup flour for cocoa powder; add 1/2 teaspoon espresso powder for depth.
- Lemon Glaze Swap: Skip royal icing and drizzle with a lemon-powdered sugar glaze for a zingy finish.
- Gluten-Free: Use a 1:1 gluten-free baking flour with xanthan gum; chill well and roll between parchment.
- Spice Bomb: Add 1 teaspoon cardamom for a perfumy, bakery-level upgrade.
- Dairy-Free: Use plant-based butter; ensure it’s firm and not too soft for shape retention.
FAQ
Can I use light molasses instead of dark?
Yes. Light molasses will yield a milder flavor and lighter color.
Avoid blackstrap molasses here—it’s too bitter and can dry out the dough.
Do I need meringue powder for royal icing?
No, but it’s convenient. You can use fresh egg whites (2 large whites + 1/2 teaspoon cream of tartar) with 4 cups powdered sugar. Just be mindful of food safety and store accordingly.
How do I stop the dough from sticking when rolling?
Chill thoroughly, work with half the dough at a time, dust lightly with flour, and roll between two sheets of parchment.
If it warms up, pop it back in the fridge for 10 minutes.
Why did my cookies puff and lose detail?
Likely over-leavening or warm dough. Measure baking soda accurately, keep dough cold, and avoid overmixing once the flour goes in. Also, don’t bake on a hot sheet pan—cool between batches.
How long does royal icing take to dry?
Surface dry in 1–2 hours, fully set in 6–12 hours depending on humidity and thickness.
For layering details, wait at least 1 hour between colors to prevent bleeding.
Can I make these ahead for gifting?
Absolutely. Bake and ice up to 5 days ahead; once dry, store airtight with parchment layers. They stay pretty and taste even better as the spices bloom.
Final Thoughts
These Gingerbread Cookies with Royal Icing deliver everything you want: bold flavor, clean shapes, and decorations that actually dry.
They’re festive, forgiving, and scalable—great for family baking or a cookie-swap triumph. Make the dough one day, bake the next, decorate when you’ve got time. Simple, strategic, delicious—IMO, the holiday win you can eat.
Printable Recipe Card
Want just the essential recipe details without scrolling through the article? Get our printable recipe card with just the ingredients and instructions.