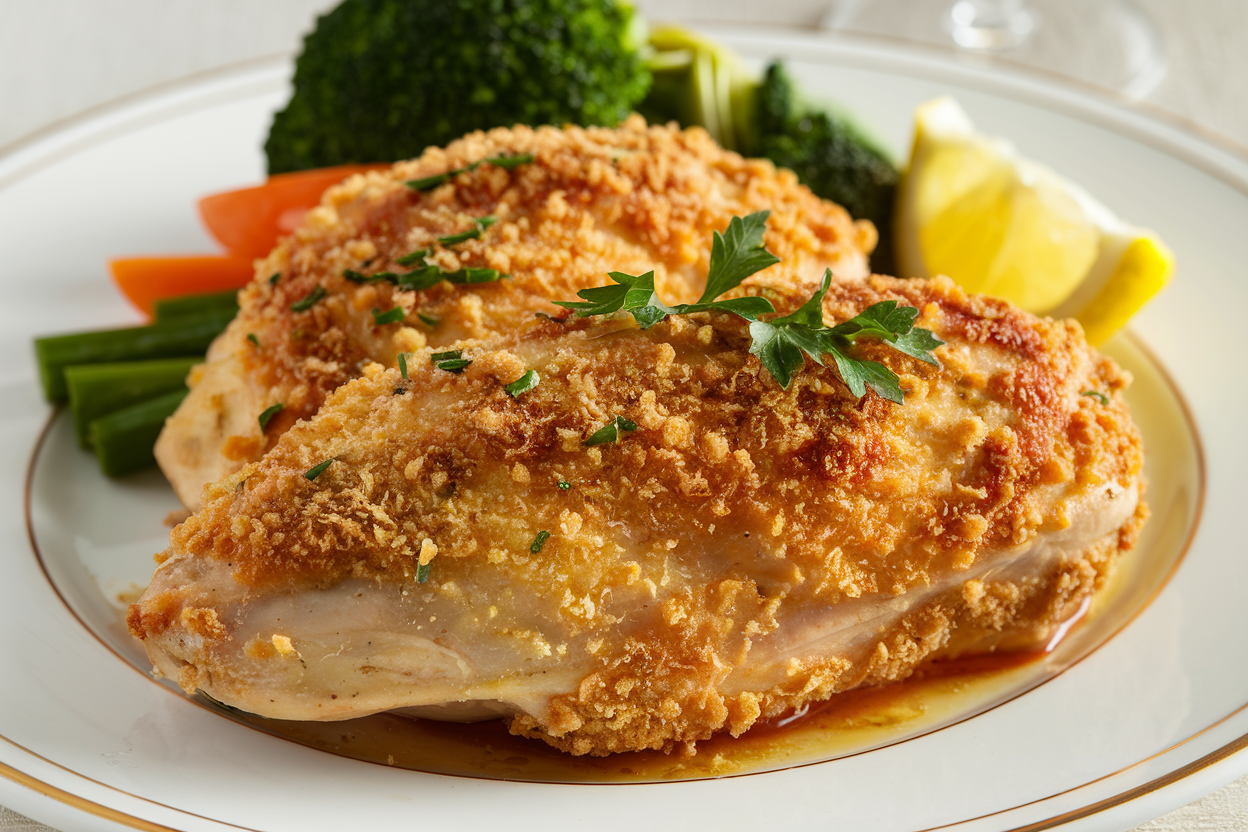
Chicken Kiev That Actually Stays Juicy: The Butter-Bomb Classic You’ll Make on Repeat
You know that moment when a knife slides into a golden-crisp chicken cutlet and a river of garlic butter pours out like it’s auditioning for a food commercial? That’s Chicken Kiev, and it’s the culinary flex your weeknight needs. It looks fancy, tastes luxurious, yet it’s secretly simple with a few pro moves.
We’re talking herby butter tucked inside tender chicken, wrapped tight, fried crisp, and baked to perfection. Want to impress guests or just yourself on a random Tuesday? This is the one.
What Makes This Recipe So Good
- That buttery core: A chive-parsley-garlic butter melts inside the chicken, turning every bite into a sauce-drenched moment.
- Crunch that delivers: Double-coating with flour, egg, and breadcrumbs gives you a shatteringly crisp shell that holds the butter in.
- Juicy, not dry: Pounding the chicken to an even thickness and finishing in the oven keep it moist and cooked evenly.
- Restaurant vibes at home: Looks like a chef-level flex, but the steps are straightforward if you follow the sequence.
- Make-ahead friendly: You can freeze the assembled Kievs and fry/bake straight from frozen.
Yes, future-you will say thanks.
What Goes Into This Recipe – Ingredients
- Chicken: 4 boneless, skinless chicken breasts (6–7 oz each)
- Herb butter:
- 8 tablespoons (1 stick) unsalted butter, softened
- 2 tablespoons fresh parsley, finely chopped
- 1 tablespoon fresh chives or dill, finely chopped
- 2–3 garlic cloves, finely minced
- 1 teaspoon lemon zest
- 1–2 teaspoons lemon juice
- 1/2 teaspoon salt
- 1/4 teaspoon black pepper
- Breading station:
- 1/2 cup all-purpose flour
- 2 large eggs, beaten with 1 tablespoon water
- 1 1/2 cups breadcrumbs (panko for extra crunch or fine crumbs for classic texture)
- 1/2 teaspoon smoked paprika (optional)
- 1/2 teaspoon garlic powder (optional)
- Salt and pepper to taste
- For frying and finishing:
- Neutral oil (canola, peanut, or sunflower) for shallow frying
- 1–2 tablespoons unsalted butter (optional, for richness when frying)
- To serve: Lemon wedges, chopped herbs, flaky salt
How to Make It – Instructions
- Make the herb butter: Mash softened butter with parsley, chives/dill, garlic, lemon zest and juice, salt, and pepper. Shape into a 4-inch log on parchment, roll tightly, and freeze 20–30 minutes until firm.
- Prep the chicken: Place each breast between two sheets of plastic or parchment. Pound to an even 1/4–1/3 inch thickness with a mallet, focusing on uniformity over aggression.
Lightly season both sides with salt and pepper.
- Stuff it right: Slice the chilled butter log into 4 equal batons. Place one baton near the lower third of a pounded breast. Fold the sides over the butter, then roll up tightly from the bottom like a burrito.
Pinch seams. If needed, secure with toothpicks.
- Chill to set: Put the rolled chicken on a plate, seam-side down, and refrigerate 20 minutes (or quick-freeze 10 minutes). This helps prevent butter blowouts.
- Set up breading: In three shallow bowls, place flour (seasoned with a pinch of salt/pepper), beaten eggs, and breadcrumbs mixed with paprika and garlic powder.
- Breading, twice: Dredge each roll in flour (shake off excess), dip in egg, then coat in breadcrumbs.
For extra insurance, dip again in egg and breadcrumbs. Press gently to seal seams.
- Fry for color: Heat 1/2 inch of oil in a heavy skillet over medium to medium-high heat (350°F if using a thermometer). Optional: add 1–2 tablespoons butter for flavor.
Fry Kievs 1–2 minutes per side until golden brown all over. Don’t cook through here; just build crust.
- Finish in oven: Transfer to a wire rack set over a sheet pan. Bake at 375°F (190°C) for 15–18 minutes, until internal temperature hits 160–165°F (71–74°C).
Rest 5 minutes; carryover will finish the job.
- Serve like a pro: Snip out toothpicks if used. Plate, sprinkle herbs, add a pinch of flaky salt, and serve with lemon wedges. Slice at the table for the dramatic butter cascade, obviously.
Storage Instructions
- Fridge: Store cooked Chicken Kiev in an airtight container up to 3 days.
Reheat at 350°F on a rack 12–15 minutes until hot and crisp.
- Freeze assembled (uncooked): Place breaded rolls on a sheet pan, freeze until solid, then bag up to 2 months. Fry directly from frozen 2–3 minutes for color, then bake 22–28 minutes.
- Freeze cooked: Cool completely, wrap individually, and freeze up to 2 months. Reheat at 350°F on a rack 20–25 minutes.
- Leftover pro tip: Slice and tuck into a warm baguette with arugula and a squeeze of lemon.
Lunch = handled.
What’s Great About This
- Scalable: Make two or make ten—assembly-line style works beautifully.
- Balanced flavors: Garlic-herb butter + lemon keeps it rich but not heavy.
- Texture contrast: Crispy outside, juicy inside, molten middle. The holy trinity of mouthfeel.
- Customizable: Swap herbs, add spice, or go gluten-free. It listens.
Avoid These Mistakes
- Skipping the chill: Warm butter will leak.
Cold butter holds shape and melts at the right time.
- Uneven pounding: Thin spots tear, thick spots undercook. Aim for uniform thickness.
- Weak seam: If you don’t fold the sides in before rolling, the butter escapes. Burrito rules apply.
- Only baking, no fry: You’ll miss that deep, even crust.
Quick fry + oven is the move, IMO.
- Overcrowding the pan: Drops oil temp, soggy breading, sadness ensues. Fry in batches.
Different Ways to Make This
- Air fryer: Spray breaded rolls lightly with oil. Air fry at 360°F for 14–18 minutes, turning halfway.
Check for 165°F internal. Results are surprisingly crisp.
- Cheese core: Add a thin baton of low-moisture mozzarella with the butter for extra ooze. Not traditional, but who’s mad?
- Herb variations: Dill for classic Eastern European vibes, tarragon for French flair, or cilantro + lime zest for a bright twist.
- Spicy Kiev: Mix Calabrian chili paste or a pinch of cayenne into the butter.
FYI, a little heat goes a long way.
- Gluten-free: Use rice flour and GF breadcrumbs. Keep the method exactly the same.
- Lighter bake-only option: Brush generously with oil and bake at 400°F on a rack 20–25 minutes. Not as shatter-crisp, but still legit.
FAQ
How do I keep the butter from leaking out?
Chill the butter, fold the sides of the chicken over it before rolling, double bread, and chill the assembled rolls before frying.
Finish on a rack so the bottom doesn’t steam and split. These small steps are your insurance policy.
Can I use chicken tenders or cutlets?
Cutlets work if they’re large enough to wrap fully around the butter. Tenders are too small; the butter would escape faster than you can say “oops.” Stick with full breasts pounded evenly.
What oil should I use for frying?
Neutral, high-smoke-point oils like canola, peanut, or sunflower.
A tablespoon of butter added to the oil boosts flavor and browning, but don’t fry in butter alone—it burns.
Why is my crust getting soggy?
Oil temperature likely dropped, or you set the chicken on paper towels. Fry hot (around 350°F), avoid crowding, and transfer to a wire rack. The rack keeps it crisp by letting air circulate.
What should I serve with Chicken Kiev?
Mashed potatoes, buttered noodles, or crispy roasted potatoes are classics.
Add a bright salad or steamed green beans with lemon to balance the richness. Simple sides let the Kiev shine.
Is this the same as Chicken Cordon Bleu?
Nope. Cordon Bleu is stuffed with ham and cheese; Chicken Kiev is all about that herb-garlic butter center.
Different personality, same irresistible energy.
The Bottom Line
Chicken Kiev is proof that smart technique beats complicated recipes. Pound evenly, chill strategically, double-coat, and finish in the oven—you’ll get a crisp shell, juicy meat, and a buttery center that steals the show. It’s impressive, repeatable, and wildly delicious.
Make one batch for dinner and another for the freezer, because future cravings are guaranteed.
Printable Recipe Card
Want just the essential recipe details without scrolling through the article? Get our printable recipe card with just the ingredients and instructions.