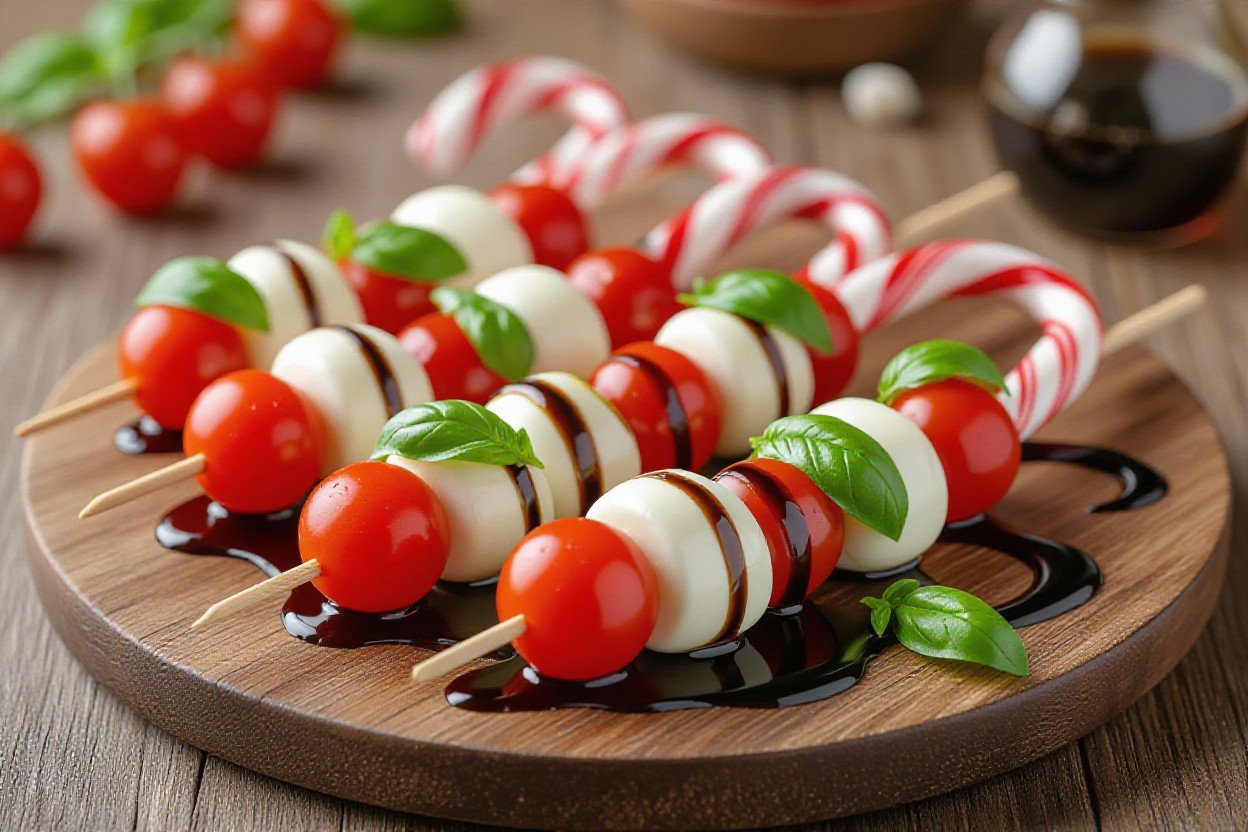
Caprese Candy Cane Appetizer
Caprese might sound fancy, but you’re about to turn it into the easiest holiday showstopper your guests have ever seen, and yep, you can totally pull this off without stressing out. You’re taking classic caprese flavors you already know – fresh mozzarella, juicy tomatoes, bright basil – and simply rearranging them into a playful candy cane shape that screams festive without screaming effort.
So if you want an appetizer that looks like you spent hours on it but actually comes together in minutes, this Caprese Candy Cane Appetizer is your new secret weapon.
Key Takeaways:
- About 90% of holiday party hosts say they want at least one no-cook appetizer on the table, and this candy cane caprese totally fits that bill – it’s literally just slicing, layering, and drizzling, so you get a crazy-cute platter with almost zero effort.
- What really sells this appetizer is the visual pop: that red-and-white candy cane pattern of tomatoes and mozzarella with fresh green basil looks super festive, so it doubles as edible decor and makes your snack table feel way more intentional.
- You can riff on it like wild – swap in flavored mozzarella, add a balsamic glaze, sprinkle flaky salt, or even tuck in some prosciutto – so it works for casual family nights or a more dressed-up holiday spread without you having to reinvent the wheel.
What’s This Caprese Candy Cane Thing All About?
It’s Basically Caprese, Dressed Up For December
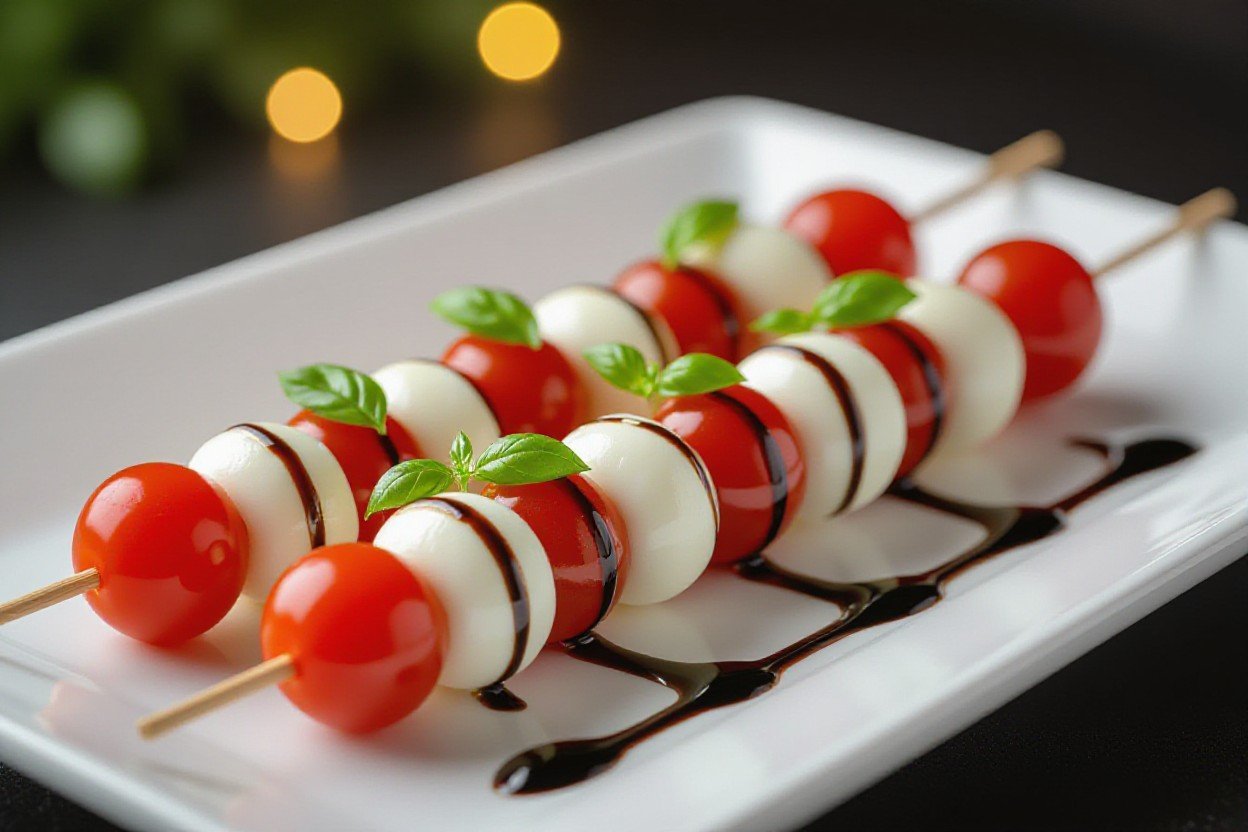
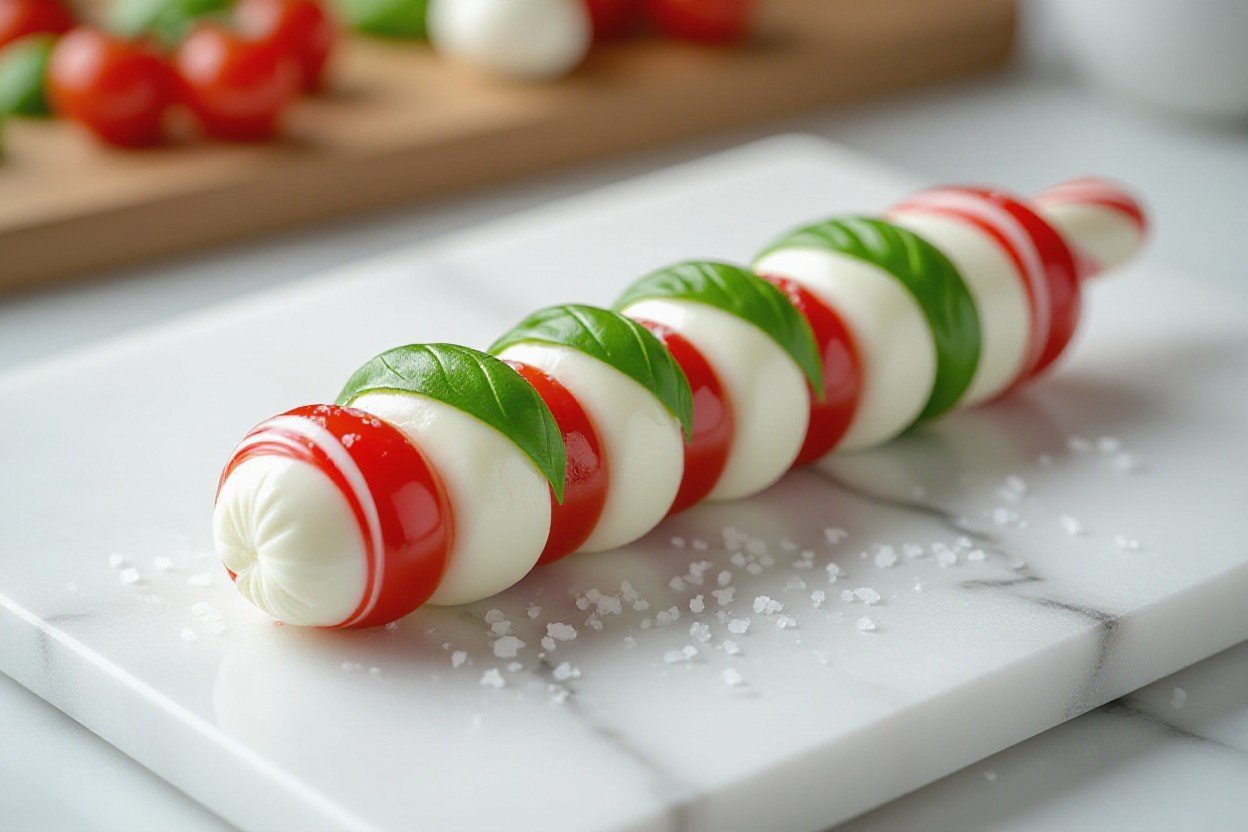
Ever wish your cheese board actually looked like it belonged on a holiday card? That’s exactly what you’re doing here: taking the classic caprese trio – fresh mozzarella, ripe tomatoes, and basil – and literally shaping it into a candy cane on your platter. You’re not reinventing the salad, you’re just re-styling it, using that simple red-and-white stripe pattern your brain instantly reads as “festive” even from across the room.
Instead of random slices piled in a bowl, you’ll line up about 16 to 20 alternating tomato and mozzarella pieces (for a standard 12-inch platter) into a curved cane shape, then tuck basil leaves in between like little green ribbons. A drizzle of extra-virgin olive oil, a few cracks of black pepper, and a pinch of flaky salt turn it from cute idea into “wow, who catered this?” status. And if you want to get a bit extra, you can add a small dipping dish of balsamic reduction at the base as the “hook” – suddenly you’ve got interactive finger food, not just pretty decor.
Why This Works So Well On A Busy Holiday Table
What really makes this appetizer pull its weight is how much you get out of so little effort: 4 ingredients, about 10 minutes of hands-on time, and you’ve got something that feeds 6 to 8 people as a starter. You’re using those clear visual cues – stripes, curve, contrast – that make guests stop and actually notice the food instead of just walking past. And because everything is in neat slices, people can grab one or two pieces without destroying the whole design, which means it stays Instagram-pretty a lot longer.
On top of that, you’re hitting a bunch of boxes at once: naturally gluten-free, vegetarian, light but still satisfying, and easy to scale. Make one large candy cane on a big board for a party, or two smaller ones on separate plates if you’ve got a crowded buffet. The best part is that even if your slices aren’t perfectly even or your curve is a little wonky, it still reads as “candy cane” – so it looks intentionally whimsical instead of like you messed up.
Why I Think This Appetizer’s a Game Changer
It Solves About 4 Holiday Problems At Once
What blows my mind is that you’re basically tossing together three ingredients, yet you end up checking off presentation, flavor, dietary needs, and timing in one shot. You get that red-white-green pop that looks like you spent 45 minutes plating… but in reality you’re done in maybe 8-10 minutes, even less if you slice your mozzarella in advance. Plus, it’s naturally gluten free, vegetarian, and easy to tweak for different diets – you can swap in lactose-free mozzarella or skip the balsamic for your super simple eaters and nobody feels like they’re getting the “diet” plate.
Because everything is cold and sturdy, you can plate the candy cane up to 2 hours before guests show up, cover it lightly, and stash it in the fridge without losing that fresh, glossy look. You know how most appetizers either get soggy, dry out, or need to be reheated at the exact second your doorbell rings? This one just sits there quietly on your sideboard, looking gorgeous and staying fresh, freeing you up to deal with the chaos of coats, drinks, and “wait, where’s the extra chair?”
It Makes You Look Way More Advanced Than You Need To Be
What really sells this as a game changer is the ratio of effort to compliments – it’s ridiculously lopsided in your favor. You slice 12 to 16 pieces of mozzarella, cut 12 to 16 tomato rounds, layer them in that candy cane curve, tuck in a few basil leaves, and drizzle maybe 1 tablespoon of balsamic glaze. That’s it. Yet people will ask where you “learned” to plate like that, like you snuck off to culinary school in your spare time.
And you also get built-in versatility without extra work, which is the dream during the holidays. You can serve it with toasted baguette slices for the carb lovers, keep it light and low-carb for the folks watching what they eat, or even lay it next to a charcuterie board and let guests mix and match bites. One platter quietly carries a lot of weight on your table, and once you make it once, you’ll start seeing every party spread and thinking, “yeah, I’m absolutely doing the candy cane again.”
Here’s What You’ll Need to Get Started
Essential Ingredients
You want this to taste as good as it looks, so ingredient quality really matters here. Go for vine-ripened tomatoes that feel heavy for their size and have a deep red color, not those pale, rock-hard ones that live in the back of the fridge for weeks. Fresh mozzarella should be packed in water or whey, soft and slightly springy, and if you can find small mozzarella logs you can slice into even rounds, even better for getting that clean candy cane pattern.
For the basil, grab a fresh bunch where the leaves are bright and not droopy or blackened at the edges. Extra virgin olive oil should be one you actually like the taste of – a peppery, fruity oil in the 0.3% to 0.8% acidity range will usually give you a nice finish without overpowering everything. You’ll also want flaky sea salt, freshly cracked black pepper, and a good-quality balsamic glaze (or a reduced balsamic vinegar) so those finishing drizzles and pinches make the whole platter pop in both flavor and appearance.
Tools That’ll Make Life Easier
You can absolutely pull this off with basic kitchen gear, but a few smart tools make the whole process way smoother. A sharp chef’s knife or serrated tomato knife is key, because if your knife is dull you’ll crush the tomatoes instead of getting those clean 1/4-inch slices that line up nicely in the candy cane shape. A small cutting board with a groove helps corral the tomato juices so they don’t run all over your counter while you’re working.
Then comes presentation, which is half the fun here. A long rectangular platter (around 12 to 16 inches) or a large round plate gives you enough room to shape the curve of the candy cane without crowding the slices. Small tongs or even a dessert fork make it easier to nudge each tomato and mozzarella slice into place without smearing everything with oily fingers, and a squeeze bottle or small spoon for the olive oil and balsamic glaze lets you control those pretty, Instagram-friendly drizzles.
One more tip on tools: if you’re making a big batch for a party, using two cutting boards and setting up a mini assembly line saves you a ton of time – chop on one, transfer and arrange on the other, and keep a little dish towel by your side to quickly wipe your fingers so you’re not constantly washing your hands at the sink.
Step-by-Step: Making Your Own Candy Cane Masterpiece
| Prepping the Ingredients |
Prepping the IngredientsPeople usually think you can just slice some tomatoes, open a pack of mozzarella, and call it a day, but if you want that candy cane shape to actually hold up, your prep needs a tiny bit more intention. You’ll get the best results if your tomato slices are about 1/4 inch thick, all roughly the same size, and your mozzarella rounds match them pretty closely – that consistent sizing is what makes the stripes look clean instead of lopsided. Pat everything dry with paper towels too, especially the mozzarella, or you’ll end up fighting puddles of brine on your platter that smear the basil and dilute the balsamic. Another thing you might skip (but really shouldn’t) is prepping your basil and seasoning ahead of time. Pull the basil leaves off the stems and keep the prettiest, medium-sized ones for tucking between tomato and mozzarella slices, then stack and roll them to chiffonade a few for sprinkling over the top later. A tiny bowl with 1 to 2 tablespoons of good extra-virgin olive oil, a pinch of flaky salt, and a few grinds of black pepper, ready to go beside your platter, means you can assemble fast while the cheese is still cool and the tomatoes are firm, which keeps that candy cane outline sharp and photo-ready. |
| Assembling the Appetizer |
Assembling the AppetizerA lot of people try to build the candy cane from the bottom up and wonder why it creeps off the edge of the platter, so you’ll actually have a much easier time if you start by sketching the hook with your first few slices. Place your platter in front of you vertically, then lay the top tomato slice slightly angled, about 30 degrees, to mark the curve, alternating tomato and mozzarella as you slowly work your way into that candy cane swoop. Each slice should overlap the last by about a third, just like laying roof shingles, so the red and white stripes read as one continuous, flowing shape instead of a row of disconnected coins. Once the curve looks right, you can relax a bit and run the “stem” of the cane straight down the platter, keeping the same angle and spacing so the pattern stays tight. Tuck a whole basil leaf between every second or third pair of slices so you get pops of green without losing that bold red-white stripe effect, then drizzle your seasoned olive oil in a thin zigzag from top to bottom. A restrained drizzle of balsamic reduction along the outside edge of the cane, not all over the top, frames the design, keeps the white mozzarella clean, and gives you that dramatic, catering-level finish you’re going for. So once you’ve got the basics down, you can start playing with small tweaks that make your candy cane setup feel totally custom to your table. You might tighten the curve at the top to fit a smaller platter, or build a slightly thicker “stem” by staggering a double row of slices for a crowd of 12 instead of 6, and if you’re transporting it, you can even assemble the bottom half first, chill it for 15 minutes so the cheese firms up a bit, then finish the hook right before serving – you’ll be shocked how much sturdier and more intentional the whole thing looks with just those simple tweaks. |
The Flavor Combo: Why It Works So Well
How The Ingredients Play Off Each Other
Think of it like a tiny, edible tug-of-war: the juicy sweetness of ripe tomatoes on one side, the creamy, mellow mozzarella on the other, and that sharp, fragrant basil cutting right through the middle. When you layer them in small bites, your tongue hits the light saltiness of the cheese, the natural glutamates in the tomato (yep, the same umami family as Parmesan), and the herbal oils from basil almost all at once. Add a pinch of flaky salt and a drizzle of good extra-virgin olive oil – ideally something around 0.3% acidity – and suddenly a 3-ingredient combo feels like restaurant-level magic.
What really seals the deal is acidity. Your balsamic, especially if you use a thicker, aged one in the 6-12 year range, brings about 6% acidity that wakes up everything else on the plate, so the tomato tastes sweeter, the cheese tastes richer, and the basil feels brighter. You end up hitting salty, sweet, tangy, creamy, and fresh in a single bite, which is why people keep reaching back for “just one more” even when they’re technically full.
That balance of fat + acid + freshness is exactly what makes this candy cane platter disappear faster than most heavy, carb-loaded appetizers.
My Take on Serving and Storing These Bad Boys
Serving Them So They Actually Get Eaten First
On pretty much every holiday table on Instagram lately, you see grazing boards packed edge to edge, so you want your caprese candy cane to hold its own in that crowd. Try laying it on a long rectangular board and give it some breathing room, then tuck a tiny bowl of flaky salt on one side and a dish of balsamic glaze on the other so people can doctor each bite how they like. If you’re feeding, say, 10 to 12 people, plan for at least 2 “stripes” of tomato and mozzarella per person, so that usually means a full 8 ounce log of mozzarella and about 14 to 16 cherry tomatoes. And if you’re serving outside or near a warm oven, keep the platter in the fridge until about 15 minutes before guests walk in so the cheese stays cool but still has that soft, creamy texture when they dive in.
On the storing front, you’ve got a sweet spot of about 24 hours if you want everything to taste fresh and not tired. Assemble the candy cane without salt, without oil, and without balsamic, then cover the board tightly with plastic wrap, or transfer sections of it into shallow airtight containers if your fridge space is tiny like most of ours. When you’re ready to put it out, bring it to room temp for 10 to 20 minutes, pat any extra moisture off the mozzarella with a paper towel, then finish with your olive oil, seasoning, and basil so it looks like you just built it from scratch. Leftovers, if you have any, can be chopped the next day into a quick pasta salad with some cooked penne and a spoon of pesto – zero waste, and you basically get a whole new dish out of it.
Conclusion
Now the funny thing about a Caprese candy cane appetizer is that something so simple can totally steal the whole show on your table. You’re not just putting out cheese and tomatoes, you’re setting up this playful little scene that makes people lean in, snap a photo, then immediately grab a bite. And once you’ve made it once, you’ll see how fast your hands start doing it on autopilot – slice, layer, drizzle, done.
Now when you pull this out for your next gathering, you’re not stressing about complicated recipes or last-minute cooking, you’re just arranging what you already know tastes amazing into a shape that feels a bit magical. You get that perfect combo of fresh, salty, creamy, and bright, and it looks like you tried way harder than you actually did, which is kind of the dream, right? So keep this one in your back pocket, tweak it to your taste, and let it quietly become your holiday party signature.