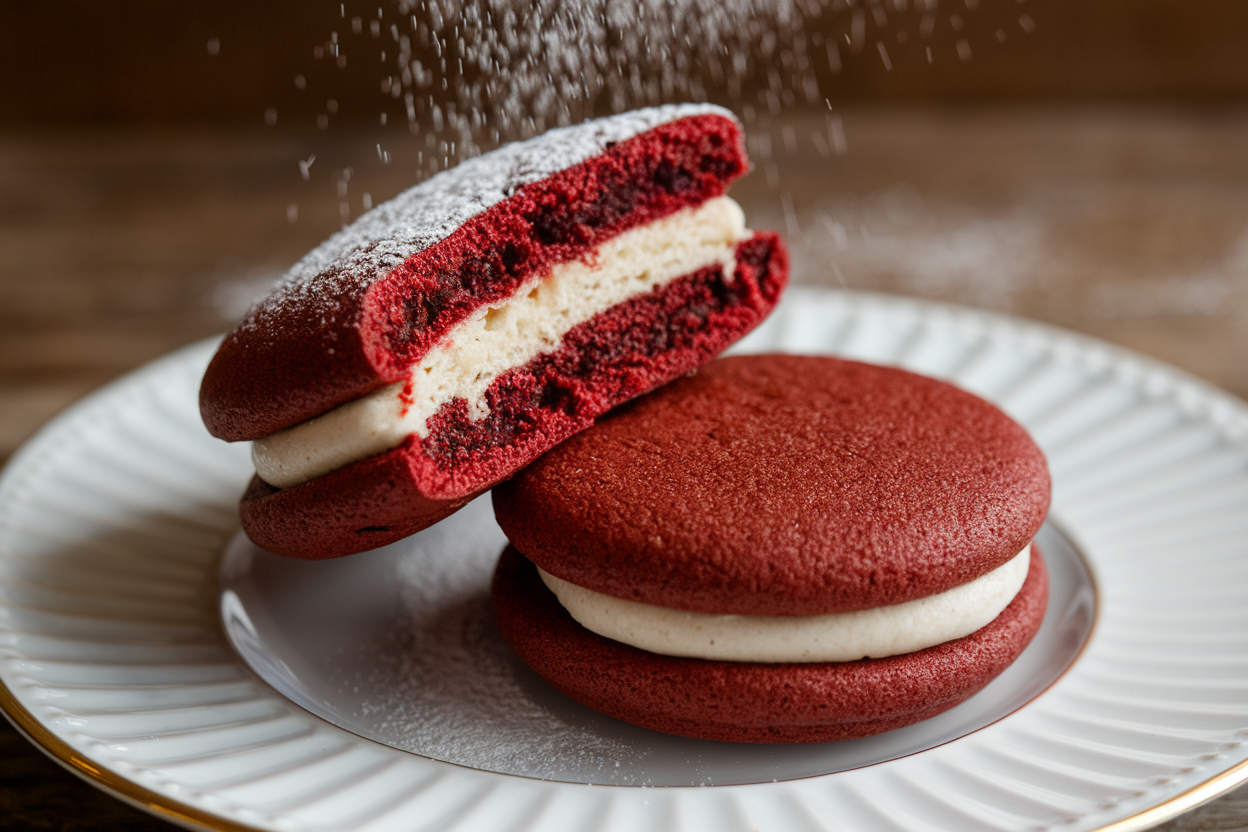
Red Velvet Whoopie Pies That Steal the Show: Bakery-Style, Pillow-Soft, and Totally Addictive
Forget cupcakes. If you want applause at the table, you bring Red Velvet Whoopie Pies—two plush, cocoa-kissed cookies hugging a cloud of tangy cream cheese frosting. They look dramatic, taste nostalgic, and take less time than a grocery run gone wrong.
You’ll get bakery-level results without a pastry degree or fancy tools. And yes, they’re dangerously easy to eat. Make a batch, and watch them disappear like a Netflix free trial.
What Makes This Special
Red velvet is more than food coloring—it’s a subtle cocoa flavor, gentle tang, and a plush crumb that melts in your mouth.
Sandwich that with a not-too-sweet cream cheese filling, and you’ve got balance: rich, tangy, and just sweet enough. These whoopie pies bake up uniform and soft, with a trademark “dome” that looks pro. Plus, they’re portable, shareable, and party-proof.
It’s dessert charisma, on demand.
Ingredients Breakdown
- All-purpose flour: The base for structure. Spoon and level to avoid dense cakes.
- Unsweetened cocoa powder: A little goes a long way; Dutch-process gives deeper color and flavor.
- Baking soda: Leavening for lift and that gentle dome.
- Salt: Flavor booster. Don’t skip it.
- Unsalted butter (room temp): For tenderness and flavor in both cookies and filling.
- Granulated sugar: Sweetness and structure.
- Egg: Binds and enriches the batter.
- Buttermilk: Signature tang and moisture; activates baking soda for lift.
- Vanilla extract: Rounds out flavor.
- Distilled white vinegar: Classic red velvet acidity; enhances color and rise.
- Red gel food coloring: Gel gives vibrant color without thinning the batter.
- Cream cheese (block, full-fat, room temp): For the filling—tangy and rich.
- Powdered sugar: Sweetens and stabilizes the filling.
- Heavy cream or milk (optional): To adjust filling consistency, if needed.
Step-by-Step Instructions
- Prep the stage. Heat oven to 350°F (175°C).
Line two baking sheets with parchment. Set out butter and cream cheese to soften.
- Whisk dry ingredients. In a bowl, whisk 2 cups flour, 2 tablespoons cocoa powder, 1/2 teaspoon baking soda, and 1/2 teaspoon salt. Set aside.
- Cream butter and sugar. In a large bowl, beat 1/2 cup unsalted butter with 1 cup granulated sugar until light and fluffy, about 2–3 minutes.
This traps air for tender cookies.
- Add egg and vanilla. Beat in 1 large egg and 2 teaspoons vanilla until smooth. Scrape the bowl.
- Color and acid. Stir in 1 teaspoon distilled white vinegar and 1–1.5 teaspoons red gel food coloring. Aim for a bold brick-red; you can adjust later.
- Alternate dry and wet. Add the dry mix in two additions, alternating with 3/4 cup buttermilk.
Begin and end with dry. Mix just until combined—overmixing = dense pies.
- Adjust color. If needed, add a bit more gel for a vibrant hue. The batter should be thick, scoopable, and glossy.
- Portion. Use a small cookie scoop (about 1.5 tablespoons) to drop mounds 2 inches apart.
For smooth tops, lightly wet your finger and tap down any peaks.
- Bake. 10–12 minutes, until the tops spring back when touched and edges look set. Don’t overbake; they should be soft.
- Cool. Let rest 5 minutes on the sheet, then transfer to a rack to cool completely. Warm cookies + frosting = slippery disaster.
- Make the filling. Beat 8 ounces cream cheese and 1/4 cup unsalted butter until creamy, 2 minutes.
Add 2 teaspoons vanilla, a pinch of salt, and 2.5–3 cups powdered sugar gradually, beating until fluffy. Add 1–2 teaspoons cream if needed for spreadable thickness.
- Assemble. Pair cookies by size. Pipe or spread 1–2 tablespoons filling onto the flat side of one cookie.
Top with its partner and twist gently to set.
- Set. Chill assembled pies 20–30 minutes for clean edges and easy handling. Then serve like the hero you are.
Storage Instructions
- Refrigerate: Store in an airtight container for up to 4 days. Cream cheese filling needs the chill.
- Layer smart: Place parchment between layers to prevent sticking.
- Serve: For best texture, let them sit at room temp 15–20 minutes before eating.
- Freeze: Wrap individually and freeze up to 2 months.
Thaw overnight in the fridge. FYI: The color stays vibrant.
Why This is Good for You
- Portion control built-in: Each sandwich is a self-contained treat—satisfying without wrecking your week.
- Real ingredients: Buttermilk, cocoa, and cream cheese give flavor without relying on fake shortcuts.
- Mood food: Sharing dessert boosts connection and joy. Not a doctor, but your taste buds will agree.
- Energy-on-demand: Quick carbs for events, celebrations, or a 3 p.m. slump rescue.
Moderation, obviously.
Avoid These Mistakes
- Using liquid food coloring: It waters down the batter and dulls the color. Gel or paste only.
- Skipping the vinegar: It’s classic to red velvet—enhances color and reacts with baking soda for tender lift.
- Overbaking: Hard cookies = sad whoopie pies. Pull them when they’re set and springy, not dry.
- Warm assembly: Filling melts on warm cookies and slides out like a failed sandwich.
Cool completely first.
- Runny frosting: Add powdered sugar to thicken, or chill briefly. Too soft and your pies won’t hold shape.
- Poor measuring: Spoon and level flour. Scooping packs it in and turns your batter heavy.
Different Ways to Make This
- Mini whoopie pies: Use a 1-tablespoon scoop; bake 8–9 minutes.
Perfect for dessert platters.
- Chocolate chip twist: Fold in 1/3 cup mini chips to the batter for pops of texture.
- White chocolate drizzle: Melt and drizzle over the tops after assembling for a bakery finish.
- Cream cheese marshmallow filling: Beat in 1 cup marshmallow creme with the cream cheese for extra fluff.
- Gluten-free: Use a 1:1 gluten-free flour blend with xanthan gum. Batter may need 1–2 teaspoons extra buttermilk.
- Valentine’s flair: Roll the edges in red, pink, or white sprinkles. Cute?
Yes. Subtle? Absolutely not.
- Orange zest surprise: Add 1 teaspoon orange zest to the filling for a bright, fancy vibe.
FAQ
Can I use natural food coloring?
Yes, but expect a more muted red—sometimes leaning brown due to cocoa.
Beet powder or natural gels work best; start with small amounts and adjust. Flavor impact is minimal, so no worries there.
Why did my whoopie pies spread too much?
Your batter may have been too warm or too thin. Chill the batter 15 minutes, ensure you measured flour correctly, and avoid overmixing.
Also, make sure your baking sheets are cool between batches.
Can I make the cookies ahead and fill later?
Absolutely. Bake and cool the cookies, then refrigerate in an airtight container for up to 2 days. Fill the day of serving for freshest texture.
What if I don’t have buttermilk?
Stir 3/4 cup milk with 2 teaspoons lemon juice or vinegar and rest 5 minutes.
It’s not identical, but it delivers the acidity and tenderness you need. IMO, real buttermilk is still best.
How do I get perfectly round cookies?
Use a cookie scoop and tap down peaks. After baking, you can lightly trim any uneven edges with a small round cutter while still slightly warm.
Or embrace rustic charm—your call.
Is the filling safe at room temperature?
Because it’s cream cheese-based, keep it chilled when storing. Serving at room temp for 1–2 hours is fine. After that, back to the fridge.
In Conclusion
Red Velvet Whoopie Pies deliver bakery drama with weeknight effort: soft, scarlet cookies, silky cream cheese filling, and a flavor profile that just works.
They’re simple, fast, and almost impossible to mess up if you follow the basics. Make them mini, zhuzh them with drizzle, or keep them classic—either way, you’ll look like a dessert genius. Ready to be the person everyone asks for the recipe from?
You’ve got it.
Printable Recipe Card
Want just the essential recipe details without scrolling through the article? Get our printable recipe card with just the ingredients and instructions.