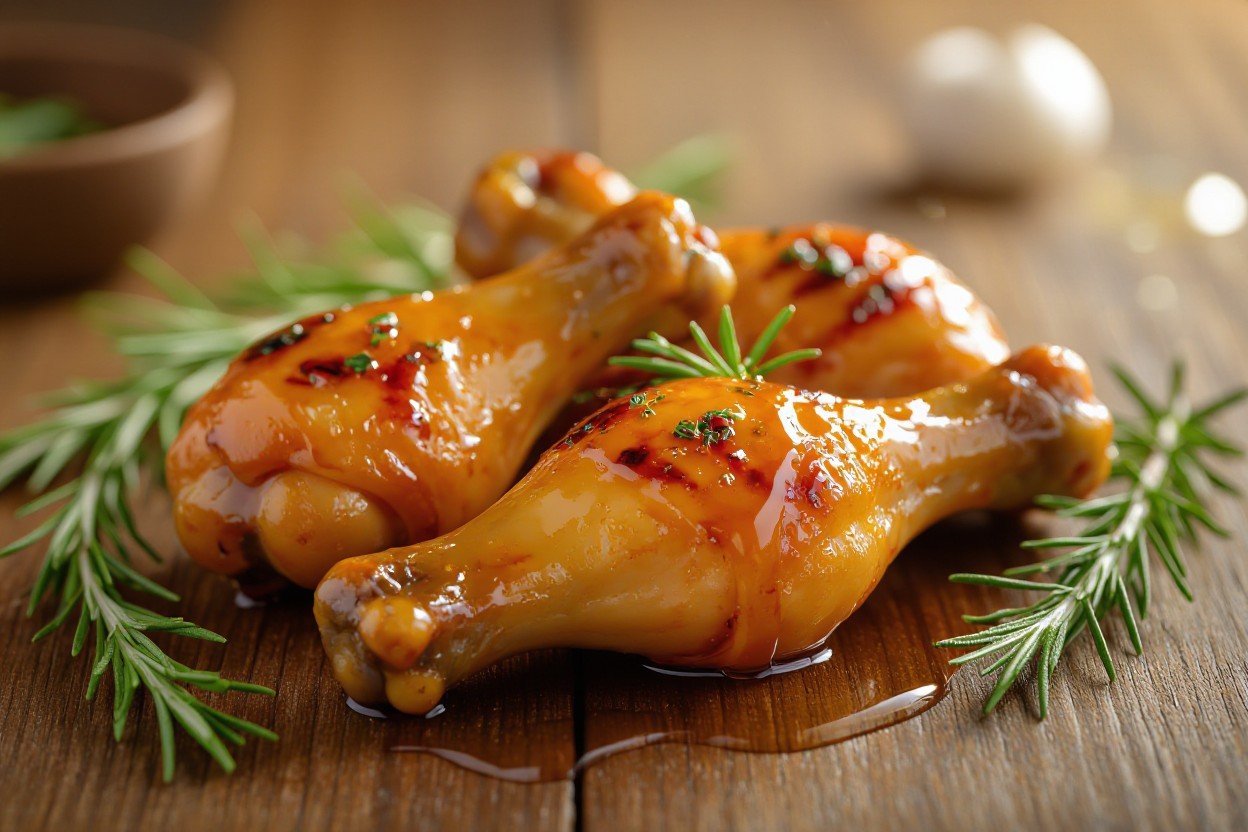
Chicken Drumsticks with Honey Glaze
Just imagine biting into perfectly caramelized chicken drumsticks coated in a sweet and savory honey glaze that delivers restaurant-quality flavor right in your kitchen. This dish combines tender, juicy chicken with a glossy glaze that balances sweetness with subtle tanginess, creating a meal your whole family will love. You’ll find that preparing these drumsticks requires minimal ingredients and effort, yet produces impressive results that work equally well for weeknight dinners or entertaining guests. The honey glaze creates a beautiful golden-brown finish while keeping the meat moist and flavorful throughout the cooking process.
Key Takeaways:
- Honey glaze creates a beautiful caramelized coating on drumsticks while adding a perfect balance of sweetness to the savory chicken
- Drumsticks are an economical and forgiving cut of meat that stays moist during cooking, making them ideal for both beginners and experienced cooks
- The recipe works well for weeknight dinners or meal prep, as the glazed drumsticks can be baked in one pan and paired with simple sides
Ingredients
Getting your ingredient list right makes all the difference between a mediocre weeknight dinner and a show-stopping meal that’ll have everyone reaching for seconds. You’ll need about 8-10 chicken drumsticks for this recipe, which typically weighs around 3 pounds total and serves 4-5 people generously. The beauty of drumsticks lies in their forgiving nature – the dark meat stays juicy even if you slightly overcook them, unlike their finicky breast counterparts.
Beyond the star ingredient, you’re looking at a simple pantry raid for the glaze components. The honey acts as both sweetener and natural thickener, creating that glossy coating you see in restaurant-quality dishes. You’ll also need soy sauce for depth, garlic for aromatics, and a few supporting players that transform these basic elements into something extraordinary. Fresh ingredients always outperform their dried or processed alternatives here, particularly when it comes to the garlic and ginger.
Chicken Drumsticks
You’ll want to select drumsticks that are roughly uniform in size – aim for pieces that weigh between 4-5 ounces each. This consistency ensures even cooking, so you won’t end up with some pieces dried out while others remain underdone. Look for drumsticks with smooth, unblemished skin that appears slightly moist but not slimy. The color should be pale pink to light yellow, depending on the chicken’s diet. Organic or free-range drumsticks often have slightly tougher skin that crisps up beautifully under high heat.
Pat your drumsticks completely dry with paper towels before seasoning – moisture is the enemy of crispy skin. Many home cooks skip this step and wonder why their glaze slides right off or their skin turns rubbery. If you have time, leave the drumsticks uncovered in your refrigerator for 2-4 hours after drying them. This technique, borrowed from professional kitchens, allows the skin to dry out further and results in an incredibly crispy exterior that holds onto the honey glaze like a dream.
Honey Glaze Components
Your glaze starts with ½ cup of honey – raw or regular works fine, though raw honey offers more complex flavor notes with hints of the flowers the bees visited. You’ll balance this sweetness with ¼ cup of low-sodium soy sauce, which brings that savory umami punch that keeps the dish from tipping into dessert territory. Three cloves of minced garlic and one tablespoon of freshly grated ginger add aromatic complexity, while two tablespoons of rice vinegar cut through the richness with bright acidity.
The supporting cast includes one tablespoon of sesame oil for nutty depth and ½ teaspoon of red pepper flakes if you want a subtle heat that builds gradually. Some recipes call for cornstarch as a thickener, but you won’t need it here – the honey naturally reduces and thickens as it cooks, creating a syrupy consistency that clings to the meat. A pinch of black pepper rounds out the flavor profile without overwhelming the other ingredients.
Mix all your glaze components together in a small bowl before you start cooking, allowing the flavors to meld for at least 10 minutes at room temperature. This resting period lets the garlic and ginger infuse into the liquids, distributing their flavors more evenly throughout the glaze. You’ll reserve about ¼ cup of this mixture for brushing on during the final minutes of cooking – never use glaze that’s touched raw chicken for finishing, as food safety demands a fresh batch for that final glossy coat.
Preparation
Getting your drumsticks ready for cooking involves two distinct phases that work together to create layers of flavor. You’ll need about 20 minutes of active prep time, though the marinating process requires patience. The key to achieving restaurant-quality results lies in properly seasoning the meat and creating a glaze with the right consistency—one that clings to the chicken without burning during the cooking process.
Start by patting your drumsticks completely dry with paper towels, as excess moisture prevents proper browning and creates steam instead of the crispy exterior you’re after. Room temperature chicken cooks more evenly than cold meat straight from the refrigerator, so let your drumsticks sit out for 15-20 minutes before you begin marinating. This simple step reduces cooking time by approximately 25% and helps prevent the common problem of chicken that’s charred on the outside but undercooked near the bone.
Marinating the Chicken
Your marinade should penetrate the meat rather than just coat the surface. Combine 3 tablespoons of olive oil, 2 teaspoons of salt, 1 teaspoon of black pepper, 1 teaspoon of garlic powder, and half a teaspoon of smoked paprika in a large bowl. Score each drumstick with two shallow diagonal cuts on opposite sides—these slashes allow the marinade to reach deeper into the meat and create more surface area for the glaze to adhere to later. Massage the marinade into every drumstick, paying special attention to working it into those cuts you’ve made.
Place your marinated drumsticks in a sealed container or zip-top bag and refrigerate for at least 2 hours, though overnight marination yields the best results. The salt in your marinade breaks down protein structures through a process called denaturing, which tenderizes the meat and allows it to retain more moisture during cooking. If you’re short on time, even 30 minutes of marinating will improve your final dish, but you’ll notice a significant difference in tenderness and flavor depth when you allow the full 8-12 hour window.
Preparing the Glaze
Your honey glaze needs the right balance of sweetness, acidity, and viscosity to coat the drumsticks without sliding off or caramelizing too quickly. Whisk together half a cup of honey, 3 tablespoons of soy sauce, 2 tablespoons of apple cider vinegar, 1 tablespoon of Dijon mustard, and 2 minced garlic cloves in a small saucepan. The soy sauce adds umami depth and saltiness that prevents the honey from tasting one-dimensional, while the vinegar cuts through the richness and helps the glaze achieve that glossy finish you see in professional kitchens.
Bring your mixture to a gentle simmer over medium heat, stirring constantly to prevent the honey from scorching on the bottom of the pan. After about 5-7 minutes, the glaze will reduce by roughly one-third and coat the back of a spoon—this is the consistency you’re looking for. If you can draw a line through the glaze on your spoon with your finger and it holds for a second before slowly flowing back together, you’ve nailed it.
Remove the saucepan from heat and let your glaze cool for 10 minutes before using it on the chicken. Hot glaze applied to raw chicken can cause uneven cooking and increases the risk of burning during the roasting process. You’ll reserve about one-quarter of this glaze in a separate bowl for basting during the final minutes of cooking—never use glaze that’s touched raw chicken as a finishing sauce unless you boil it for at least 2 minutes to kill any bacteria.
Cooking Methods
Baking
Preheat your oven to 400°F (200°C) for perfectly cooked drumsticks with a caramelized honey glaze. You’ll want to arrange the drumsticks on a wire rack set over a baking sheet lined with aluminum foil—this setup allows hot air to circulate around the chicken while catching any drips for easy cleanup. Brush your honey glaze on the drumsticks during the last 15 minutes of cooking to prevent burning, as the sugars in honey can char quickly at high temperatures. The total baking time should be 40-45 minutes, and you’ll know they’re done when an instant-read thermometer inserted into the thickest part reads 175°F (80°C).
Apply your glaze in two stages for maximum flavor and shine. Give the drumsticks their first coat at the 30-minute mark, then brush on a second layer 10 minutes later. This double-glazing technique creates those gorgeous mahogany-colored drumsticks you see in restaurants. For an extra crispy skin, switch your oven to broil for the final 2-3 minutes, keeping a close watch to avoid burning. The glaze will bubble and turn glossy, creating a sticky-sweet coating that clings to every bite.
Grilling
Set up your grill for two-zone cooking by banking the coals to one side or turning on only half your gas burners to medium-high heat (around 375°F). Start the drumsticks on the cooler side of the grill, which allows them to cook through without burning the exterior—you’re looking at about 25-30 minutes of indirect heat, turning every 7-8 minutes. This method prevents the common mistake of charred skin with raw meat near the bone. Once the internal temperature reaches 165°F, move the drumsticks to the hot side for glazing.
Brush your honey glaze on during the final 5-7 minutes over direct heat, turning frequently to build up layers without scorching. The flames might flare up slightly from the dripping glaze, so keep your tongs ready and stay attentive. Each turn should take no more than 60-90 seconds, allowing the sugars to caramelize into a sticky, lacquered finish. You’ll see the glaze transform from liquid to a thick coating that glistens under the grill marks.
The smoke from the grill adds an irreplaceable depth to the honey glaze that you simply can’t achieve in an oven. Wood chips—hickory or applewood work beautifully—can take your drumsticks to the next level if you soak them for 30 minutes and add them to your coals or smoker box. The combination of smoky char and sweet honey creates a balanced flavor profile that makes grilled drumsticks a summer favorite at any backyard gathering.
Serving Suggestions
Ideal Side Dishes
Your honey-glazed drumsticks pair beautifully with sides that balance their sweet and savory profile. Roasted vegetables like Brussels sprouts, carrots, or asparagus complement the glaze’s richness while adding nutritional value to your meal. You can toss these vegetables with olive oil and garlic, then roast them at 400°F for 20-25 minutes until they develop caramelized edges. Creamy mashed potatoes or garlic herb rice also work exceptionally well, as their mild flavors allow the honey glaze to remain the star of your plate.
Fresh salads provide a crisp contrast to the sticky-sweet drumsticks. A simple arugula salad with lemon vinaigrette cuts through the richness, while coleslaw adds both crunch and tang. For a heartier option, consider serving cornbread or dinner rolls to soak up any extra glaze on the plate. Grilled corn on the cob brushed with butter makes an excellent summer pairing, and steamed green beans with almonds offer a lighter alternative that won’t overshadow your main dish.
Presentation Tips
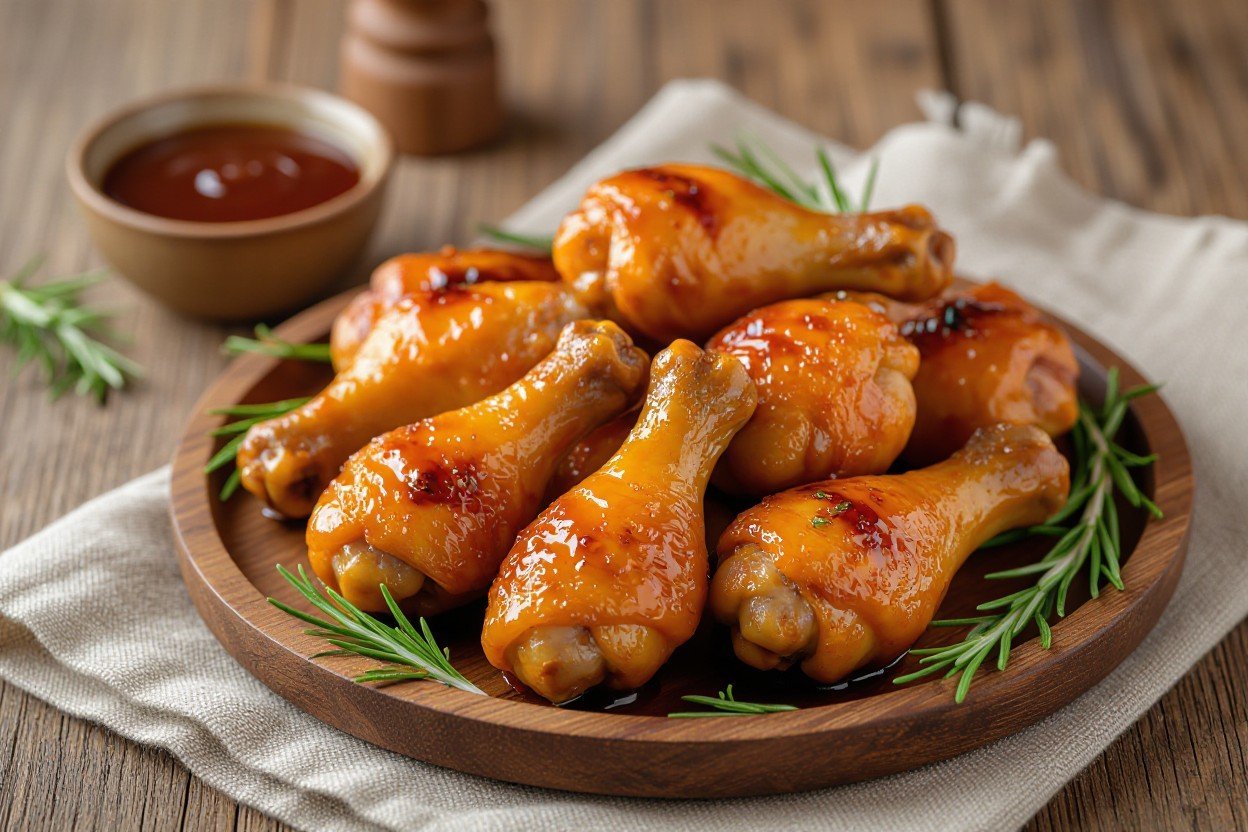
Arrange your drumsticks on a large white platter to showcase the glossy caramelized glaze. You can garnish the platter with fresh herbs like parsley, cilantro, or thyme sprigs to add color and visual appeal. Consider these finishing touches to elevate your presentation:
- Drizzle any remaining glaze from the pan over the drumsticks for extra shine
- Sprinkle sesame seeds or chopped green onions across the top for texture
- Add lemon or lime wedges around the platter for guests who prefer citrus brightness
- Place the drumsticks in a circular pattern with the meatier end facing outward
- The presentation becomes restaurant-quality when you serve them on individual plates with sides arranged thoughtfully alongside
Serving temperature matters significantly for both taste and texture. You want to let the drumsticks rest for 3-5 minutes after removing them from the oven, which allows the juices to redistribute throughout the meat. This resting period also lets the glaze set slightly, creating that perfect sticky coating without being too runny. For family-style serving, keep the platter warm by placing it on a heating pad or warming tray. Individual plating works best for dinner parties where you can create composed plates with carefully positioned sides. Your guests will appreciate the effort when they see drumsticks arranged with the bone ends wrapped in decorative foil or parchment paper for easy handling.
- Serve with small bowls of warm water and lemon slices for finger cleaning
- Provide extra napkins since the glaze creates deliciously messy eating
- Use wooden serving boards for a rustic, family-friendly presentation
- Garnish with edible flowers like nasturtiums for special occasions
- The final touch of flaky sea salt sprinkled just before serving enhances both flavor and visual appeal

Variations
The beauty of honey-glazed chicken drumsticks lies in their adaptability to your flavor preferences and what you have on hand in your pantry. You can transform the basic glaze into something entirely different with just a few ingredient swaps, making this recipe perfect for weeknight dinners when you want variety without learning a completely new technique. Each variation maintains the sticky, caramelized exterior you’re after while introducing new flavor dimensions that can complement different side dishes and seasonal ingredients.
Your choice of variation can also help you cater to different palates at your table. Some family members might prefer the classic sweet profile, while others crave more heat or herbaceous notes. Preparing a double batch of the base glaze and splitting it into two bowls allows you to create multiple versions simultaneously, giving everyone their preferred flavor without extra work.
Spicy Honey Glaze
Adding heat to your honey glaze creates a perfect balance between sweet and spicy that appeals to those who enjoy bolder flavors. Mix 2 teaspoons of sriracha sauce or 1 teaspoon of cayenne pepper directly into your standard honey glaze recipe, adjusting the amount based on your heat tolerance. For a more complex spice profile, combine 1 tablespoon of gochugaru (Korean red pepper flakes) with 1 teaspoon of smoked paprika, which adds both heat and a subtle smokiness that pairs exceptionally well with the caramelized honey.
The spicy variation works particularly well when you’re serving the drumsticks with cooling sides like coleslaw or cucumber salad. You’ll notice the heat intensifies slightly during the final broiling stage as the sugars concentrate, so start with less spice than you think you need for your first attempt. Fresh jalapeños, sliced thin and added to the baking dish during the last 10 minutes of cooking, provide pockets of heat while maintaining the integrity of your glaze.
Herb-Infused Glaze
Fresh herbs transform the honey glaze into a more sophisticated, garden-fresh version that works beautifully for spring and summer meals. Finely chop 2 tablespoons of fresh rosemary and 1 tablespoon of fresh thyme, then whisk them into your honey mixture along with 1 teaspoon of lemon zest. The rosemary’s pine-like quality cuts through the sweetness while the thyme adds earthy undertones, and the citrus zest brightens the entire flavor profile without making it acidic.
You can also experiment with Mediterranean herb combinations by using 2 tablespoons of fresh oregano and 1 tablespoon of fresh basil, which give the glaze an almost Italian character. This variation pairs exceptionally well with roasted vegetables like zucchini, bell peppers, and cherry tomatoes.
For the best results with herb-infused glazes, add half the herbs to your initial mixture and reserve the remaining half to sprinkle over the drumsticks during the last 5 minutes of cooking. This dual-herb approach gives you both the cooked, mellow flavor of herbs that have melded with the glaze and the bright, fresh taste of herbs that haven’t been exposed to prolonged heat. Dried herbs can substitute in a pinch, but reduce the quantity to one-third of what the recipe calls for since dried herbs have more concentrated flavors.
Storage and Reheating
Proper storage transforms your honey-glazed drumsticks from a single meal into convenient leftovers that taste nearly as good as freshly made. You’ll want to let the chicken cool to room temperature within two hours of cooking—leaving it out longer invites bacterial growth that can compromise both safety and flavor. Once cooled, transfer the drumsticks to an airtight container, arranging them in a single layer if possible to prevent the glaze from becoming overly sticky or transferring too much moisture between pieces.
The honey glaze creates a slight challenge during storage since sugar-based coatings tend to attract moisture and can make the skin lose its appealing texture. You can minimize this by placing a paper towel at the bottom of your storage container to absorb excess condensation. This simple step helps maintain better texture when you’re ready to reheat and serve the leftovers.
Refrigeration
Your honey-glazed drumsticks will stay fresh in the refrigerator for 3 to 4 days when stored properly in an airtight container. The USDA confirms this timeframe for cooked chicken, and you’ll find the flavor actually develops slightly as the honey and spices continue to meld. Place the container on a middle shelf rather than the door, where temperature fluctuations occur more frequently with opening and closing.
Reheating refrigerated drumsticks works best in a 350°F oven for 15-20 minutes, which helps restore some of the exterior crispness that refrigeration diminishes. You can also use an air fryer at 375°F for 8-10 minutes, flipping halfway through for even heating. Avoid microwaving if possible—while it’s the fastest method, it tends to make the skin rubbery and the glaze unevenly heated, creating hot spots that can burn your mouth.
Freezing Tips
Freezing extends your drumsticks’ life to 2-3 months while preserving most of their quality. You’ll get the best results by wrapping each drumstick individually in plastic wrap, then placing them together in a freezer-safe bag with as much air pressed out as possible. This double-layer protection prevents freezer burn, which appears as grayish-brown spots and creates a dry, leathery texture that no amount of reheating can fix.
- Label your freezer bag with the date and contents using a permanent marker
- Freeze drumsticks flat in a single layer until solid, then stack them to save space
- Thaw frozen drumsticks in the refrigerator overnight rather than at room temperature
- Brush on a fresh thin layer of honey glaze before reheating to revive the coating
- Knowing your freezer maintains 0°F or below ensures maximum storage time and food safety
The honey glaze holds up surprisingly well to freezing, though you may notice the texture becomes slightly less glossy after thawing. This happens because freezing causes ice crystals to form within the glaze, which can break down its smooth consistency. You can counteract this by reheating the thawed drumsticks at 375°F for 20-25 minutes, then brushing them with a fresh mixture of 2 tablespoons honey warmed with 1 teaspoon of water during the last 5 minutes of heating. This technique necessaryly “refreshes” the glaze and brings back much of the visual appeal and sticky-sweet coating that makes these drumsticks so appealing.
-
- Test one drumstick first to determine your oven’s ideal reheating time
- Add a tablespoon of water to your baking dish and cover with foil for the first 15 minutes to prevent drying
- Use a meat thermometer to verify the internal temperature reaches 165°F throughout
- Let reheated drumsticks rest for 3-4 minutes before serving to allow juices to redistribute
- Knowing the difference between reheating and recooking helps you avoid overdoing the chicken and creating a tough, dry texture
To Wrap Up
Now that you have mastered the art of making chicken drumsticks with honey glaze, you can confidently add this dish to your regular meal rotation. The combination of sweet honey, savory spices, and perfectly cooked chicken creates a meal that satisfies both adults and children alike. You have learned how the caramelization process transforms simple ingredients into a glossy, flavorful coating that enhances the natural juiciness of the drumsticks. This recipe offers you flexibility in preparation methods, whether you choose to bake, grill, or air fry your chicken to achieve that ideal balance of tender meat and crispy skin.
Now you possess the knowledge to customize your honey glaze according to your taste preferences and dietary needs. You can experiment with different honey varieties, adjust the level of heat with additional spices, or incorporate citrus elements for brightness. The versatility of this dish means you can serve it as a weeknight dinner, pack it for lunches, or present it at your next gathering. With proper storage techniques, you can prepare your honey-glazed drumsticks in advance, making your meal planning more efficient and stress-free.